
Introduction
The O2MC I/O Platform is a managed event-processing application to perform end-to-end real-time processing on streaming data with compliancy and Privacy by design in mind. The data can come from devices, sensors, file servers, websites, databases, social media, third party API's, HR applications and more. All O2MC I/O Platform applications are configured through the files written in the patented programming language DimML (Data in Motion Machine Language).
The O2MC I/O Platform application is used for compliant data logistics by getting data from any digital source, performing specific processing for specific data tuples and distributing data to one ore more end points. Communication with these applications is bidirectional so the O2MC I/O Platform application can also be used to push messages back to the original source asynchronously.
Some examples:
- Transaction monitoring and reporting
- Product recommendation
- Fraud detection and alerting
- Cross channel content personalisation
- Web clickstream analytics
You can use these docs as you see fit. Check out our Getting started guide, or explore our case-specific tutorials in order to get a flying start. Browse the reference guide if you're looking for specific syntax or settings. If any other questions arise, please contact us at support@o2mc.io.
How does the O2MC I/O Platform application work?
The architecture provides insight in several components of the O2MC I/O platform as well as the integration with external applications. Below is a description of each of the layers in the architecture and its components. The O2MC I/O Platform components can be used from the current cloud platform but they can also be installed on premise. Details on the installation of the application can be found in the chapter Setting up. Since the events are generated at the left, in the source layer, that layer will be described first before moving to right.

Sources
The O2MC I/O Platform application can capture data from any first, second or third party source. The only prerequisite is that the source is connected to the internet. This includes IoT devices and sensors, files, websites, databases, social media, third Party API's and many more. Since the architecture is aimed at real time processing of the data, the sources provides the data the moment an interaction takes place.
Connectivity layer
The connectivity layer connects all different data sources and types to the O2MC I/O Platform application for processing. For different sources, the O2MC I/O Platform application provides several specific connector types. By default, a Rest API can be created to receive data from any source. Additionally, for websites a Single Line of Code is available to connect the website to the O2MC I/O Platform application. The SLoC consists of 1 Javascript code snippet which is the same for each page and also each website. It allows bidirectional communication and after installing the SLOC on a website, no additional IT involvement is necessary to build, enhance and maintain the O2MC I/O platform application for that source. For native apps specific SDKs are available as well.
Integration layer
The integration layer provides overall robustness on the processing the events. The event hub makes sure that all events are (eventually) processed, dealing with spikes in volume and data unavailability. Additionally, event processing is facilitated as well as providing the possibility of including reference data (e.g. IP location look up) in the event on the fly.
Real time processing
The in memory analytics component is the core of the O2MC I/O Platform application. More than tens of thousands of incoming events can be processed in memory in real time. Processing includes but is not limited to ETL, sessionization, cross device user identification, predictive machine learning and other Big Data applications. The results can be distributed to many different end point with different data sets, granularity and intervals. All of this can be defined in DimML files either using existing DimML language elements or code snippets in several different languages.
The O2MC I/O Platform application has been designed with Privacy by design in mind. As a result data governance is at the core of the O2MC I/O platform and always included in any application. To illustrate this events will not be processed if the owner of the data has not given permission to do so. Additionally, the platform facilitates an extensive multi-tenant environment with extensive authentication and application isolation.
Data storage
Apart from real time integrations with third applications, the O2MC I/O Platform application can provide structured data to databases like MySQL, Oracle and MongoDB as well as provide unstructured data to log files on many other data stores. The query and connection details can be fully customized and the data stream can be throttled to prevent spikes from causing problems in the data sources. The O2MC I/O Platform application is also able to queue output data if the destination source is temporarily unavailable. The O2MC I/O Platform application does not store data so all data is located outside the platform at any location that is desired.
Installation
General usage
Project creation
To create an example DimML implementation, follow these steps:
– In the Project Explorer tab, do a right mouse click – New – Project…
– In the New Project dialog, select the General – Project wizard and click Next >
– Name the project HelloWorld and click Finish to create the project
The created HelloWorld project should appear in the Project Explorer. To proceed with the example
DimML implementation, follow these steps:
– On the HelloWorld project, do a right mouse click – New – File
– In the New File dialog, enter www.o2mc.io.dimml as File name and click Finish
– Choose Yes when asked to convert HelloWorld to an Xtext project
The created www.o2mc.io.dimml file should appear in the Project Explorer and be automatically opened in the editor. Copy and paste the code to the right into the file and save it:
concept Global {
match '*'

val href = </span><span class="n">location</span><span class="o">.</span><span class="na">href</span><span class="err">

flow
=> console
=> debug

plugin debug
}
Publishing
To publish this example project to a DimML development environment, make sure the www.o2mc.io.dimml is opened in the editor and follow these steps:
- In the toolbar, click on the Publish DimML button (or use the Ctrl+Shift+D keyboard shortcut)
- In the Publish DimML confirmation dialog, select the desired Partner and click OK
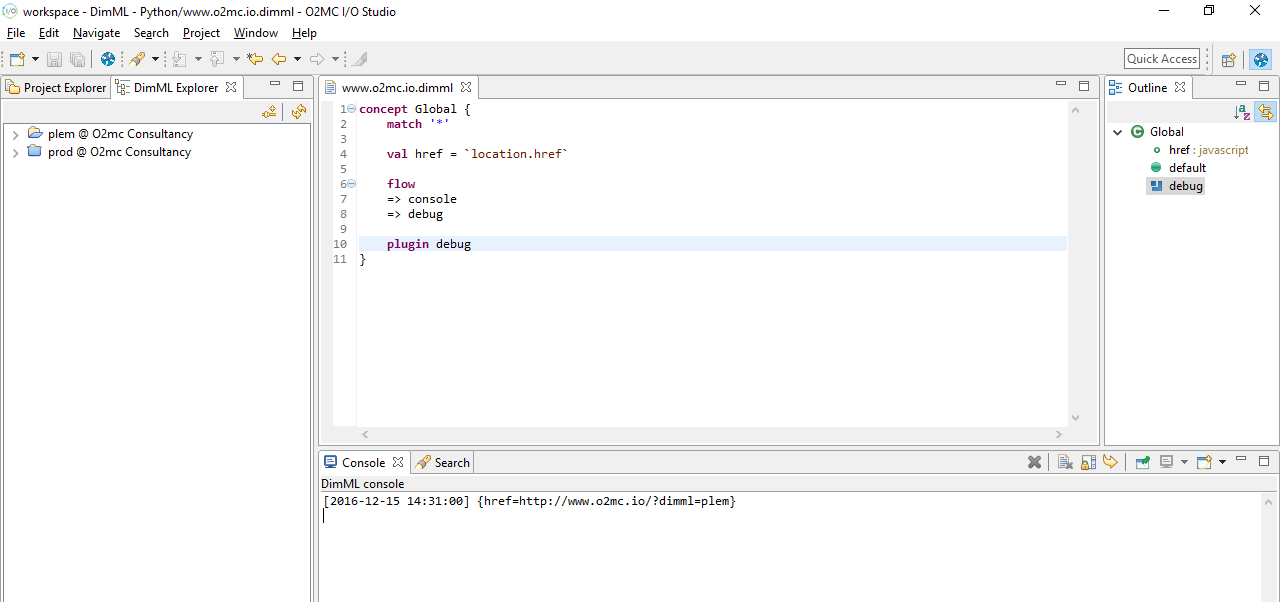
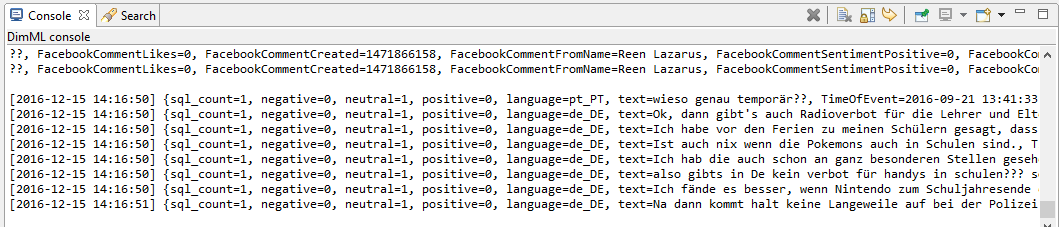
In the Console at the bottom of the window a DimML console should appear if publishing was successful. This is where the data flow information (at the point where => console is located in the DimML file) will appear when the published file is executed.
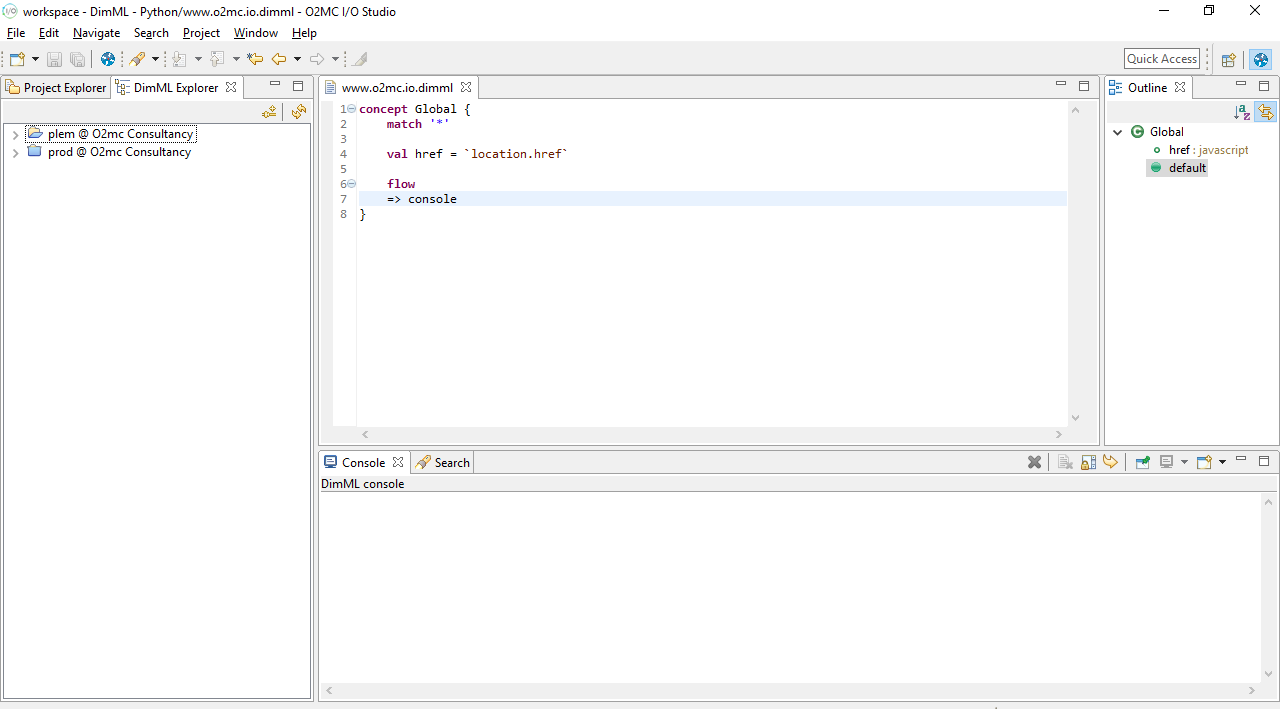
To verify that the publishing was succesful, follow these steps:
– Open the DimML Explorer
– In the top right corner of the DimML Explorer, click on Reload to update the view
– In the DimML Explorer, go to ${user} @${userGroup} – www.o2mc.io.dimml
– Double click on www.o2mc.io.dimml to open the content in an editor tab
The file should be present and the content should be equal to the code snippet copied earlier if the publishing was succesful.
Execution
To execute the example DimML file, follow these steps:
– For any website that does not have the Single Line of Code installed, add it automatically to the site by using the DimML Extension – In a web browser, go to http://www.o2mc.io/?dimml=${user} – Verify that in the browser console (F12 to open, Console tab) the following notice appears: DimML development mode: ${user} – In the DimML console in the O2mc Studio, verify that the following line appears: [yyyy-mm-dd hh:ii:ss] {href=http://www.o2mc.io/?dimml=${user}}
Note: Replace ${user} with the DimML user name associated with the user token entered in the DimML plugin configuration step earlier in this document.
Installing O2MC Studio
Prerequisites
This O2MC Studio installation guide describes the process of installing the O2MC Studio and provides the steps towards creating, publishing, and executing an example DimML file. Prerequisites for installing the O2MC Studio are
- The O2MC studio archive, which can be found here:
- An O2MC user token created for you giving access for a specific set of domains and user groups
- An O2MC user string linekd to the user token, herafter referred to as ${user}
Installation
To install the O2MC Studio, follow these steps:
- Move the archive file to the desired directory (hereafter referred to as
${o2mcStudioDir}) - Extract the archive file (Windows: right mouse click, Extract All…)
- Open the
${o2mcStudioDir}/o2mc-studio/directory - Execute O2mcStudio
- Choose a default workspace directory. This directory is used to store your DimML files on your device
DimML plugin configuration
After opening the O2mc Studio, follow these steps to configure the DimML plugin:
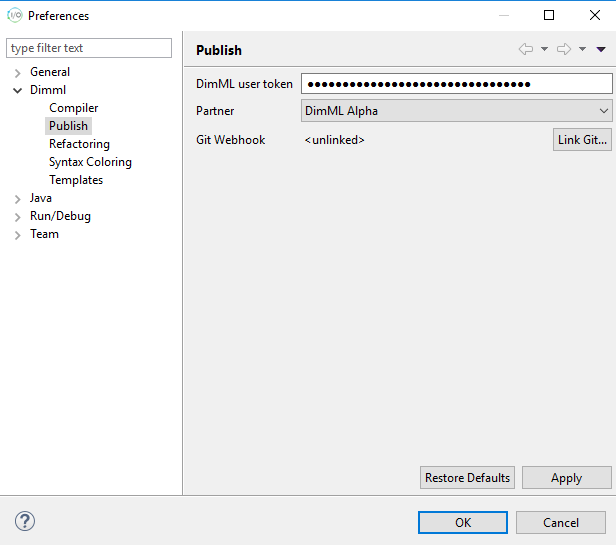
– In the menu bar, go to Window – Preferences
– In the left part of the Preferences dialog, go to Dimml – Publish
– Enter your DimML user token in the input field
– If a valid user token is given, the Partner dropdown box is automatically populated
– Select a user group from these options and click OK to finish the configuration
DimML specific parts of the O2MC studio
The O2mc Studio provides syntax highlighting for DimML files and publishing functionality. Moreover, it comes with a default DimML perspective to make DimML development more convenient. A perspective is a specific configuration of views and their positioning within a window. The DimML perspective adds the DimML Explorer tab and enables the DimML console type in the Console view. All provided features are described in more details below.
Publishing
To publish DimML files in a project to the platform, open one of the DimML files in the project and
click on the Publish DimML button in the toolbar at the top of the window. Alternatively, you can
use the Ctrl+Shift+D shortcut.
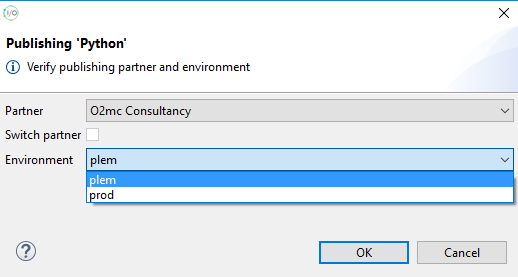
In the window that appears you can determine to which environment the project’s DimML files will be published. The Partner dropdown lists all user groups for which publishing is allowed for the configured user token. In case you change this value and this is automatically stored as the new default for future publishing. You can uncheck the Switch partner box to indicate that this partner selection should only be used for the current publish action.
The Environment dropdown can be used to publish files to the production environment. By default, this will show the user name linked to the configured user token. Changing this dropdown to prod will publish the DimML files to the production environmnt. To proceed with publishing click the OK button. If the prod environment was selected a confirmation window will appear as an extra warning that this action will affects a live website.
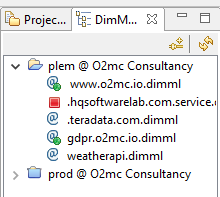
DimML Explorer
On the left side you can switch between the Project Explorer and the DimML Explorer. The DimML Explorer displays the published DimML files for the selected user group in the DimML plugin configuration. The user environment and production files are separated.
The files in the explorer tree are given icons that provide information about their platform status. Applications published to the production environment will only run for a whitelisted list of domains per partner. Reach out to your O2MC contact for adding new domains to the registered list.
In the user environment tree registered domains are indicated by adding a green light to domain files that would be allowed to run when published to production. Files without a green light should be added to the whitelist before they are actually executed after being published to production. All domain can be used in any development environment, so the registration is only necessary for production applications. In the production tree you will see that files for domains that are not whitelisted are indicated with a red light.
For service files a green arrow indicates it is active. A yellow rectangle combined with a green arrow shows that the service file does not contain any cron rules and because of that is not running. A red square indicates that the file does contain match rules but is currently not active.
DimML Console
At the bottom of the window the Console tab is shown. During DimML development this console is used to provide feedback regarding execution of DimML files for your DimML environment. Error messages and results from console flow elements are displayed here.
Just above the Console tab, on the right, is a list of icons. The Clear Console icon can be used to clear the current console output.
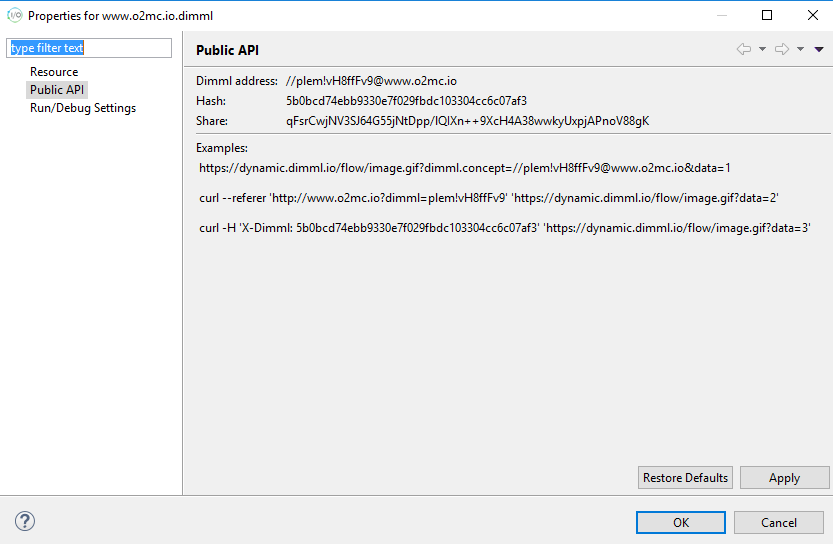
Code sharing
To share code with other developers you can generate a temporary share token that can be given to used to access your code. To obtain this share token, right click on a domain file and click Properties. In the Properties window, go to Public API to view information on how your development file can be accessed.
Besides examples of how to trigger concept execution of the selected file, at the top of the Properties window a Share token is displayed. Give this token to other developers and they will be able to temporarily access the published version of the selected file, including all imports from that file, from your development environment.
For other developers to use this share token, they can follow these steps:
– Go to the DimML Explorer tab – Click on the Connect to share icon at the top of the tab – Enter the provided share token and press OK
The share appears temporarily, until an hour after the share token creation, as an extra tree in the DimML Explorer tab and the content of the files is can be used similarly to the other trees in the DimML Explorer.
Deploying the platform
Overview
The process involves the following steps:
- Install O2MC platform application in Azure Marketplace
- Register company to obtain a product key
- Activate platform to obtain a user token
- Download and configure O2MC Studio
- Publish first DimML file and test platform
Every step is described in more detail below.
1. Install O2MC platform application in Azure Marketplace
In the Azure portal, perform the following steps to install the O2MC platform application:
- Click on
Create a resourcein the left toolbar. - Search for
O2MCin the Marketplace search bar. - Choose O2MC platform application to proceed.
- After reading the presented application description, click
Create. - Configure your instance like you normally would in Azure.
- Launch the O2MC platform application.
- When all resources are deployed, write down the assigned public IP address.
2. Register company to obtain a product key
A product key is required to activate the O2MC platform application. This product key can be obtained by registering the platform installation on the Product key registration page. This registration step does not depend on the actual platform installation. After filling out the registration form, a product key is provided. Make sure you properly store this key and have it available when you reach the platform activation step.
3. Activate platform to obtain a user token
After registration to obtain a product key (Step 1), and installation to create a running platform (Step 2), the next step is to activate the platform. The first step is to properly configure DNS, which is a required step to retrieve a valid SSL certificate (automatically using Let's Encrypt) for the configured O2MC platform application domain.
- Configure the DNS settings for the configured domain to point to public IP address written down in Step 1 after deployment of the O2MC platform application.
- When the updated DNS settings are effective, navigate to the configured domain.
- Enter the product key obtained in Step 1.
- After submitting the form, the product key is verified and an SSL certificate is requested for the domain.
- Securely store the provided user token.
4. Download and configure O2MC Studio
With an running, activated platform, the next step is to install the O2MC Studio. This assists in writing DimML files and allows publication of the files to the O2MC platform application installation in Azure.
- Download the O2MC Studio and follow the installation steps.
- During plugin configuration, enter the configured domain as API domain.
- Enter the user token obtained in Step 3 as DimML user token.
- Choose Apply and Close to finish plugin configuration.
Getting started
Hello world
helloworld.service.dimml
concept HelloWorld {
  match `once`@service

    flow
    => code[message = `'Hello world!'`]
    => console
}
Notice how we named our file helloworld.service.dimml in the example to the right. The 'service' part indicates to dimml that we'd like to start a long-running process, which might be triggered by external or internal signals.
We start off by supplying our concept with a match-rule, which will be interpreted by @service. The matching string preceding @service can be either once, keepalive or a cronjob style string. A Cron string will execute the concept according to your specified schema. keepalive will execute it once when you upload the concept, and every 5 minutes after that. once will only execute it when you upload it. This is useful in our case, as we only want to display 'Hello world!' once, for demonstration purposes.
We then tell dimml we'd like to run a concept which has a flow of data in it. These flows can have a name, which we can supply by including it behind our definition, in between parens. If we don't include anything, then the flow is implicitly named 'default'. So flow => console is the same as flow (default) => console.
The next part, the code flow, creates a variable with the name 'message'. This variable gets assigned the output of the codeblock (the part in between the backticks `) which enclose the code. Our groovy code then runs on the server and, in true groovy fashion, if we don't explicitly return anything, the last value operated on, gets returned. In this case it's the string 'Hello world!'
The next element in the flow is [console](#console). When you insert a [console](#console) flow, dimml will try to output the current variables, along with the values they contain, to your development console in o2mcstudio.
In our case it will echo back:
[2017-10-17 13:37:00] {message=Hello world!}
The URL will contain an identifier for your sandbox identifier so the platform knows which sandbox application to open.
Clickstream data
concept Global {
  match '*'

    val url = `window.location.href`
    flow => console

    plugin script `console.log( 'Hello world' )`
}
The code in the example to the right does the following:
- It defines a concept called “Global”
- The concept encapsulates all the code within the accolades. That code is executed if the concept is successfully matched (see below).
- The Global concept will match all URLs (‘*’). This means that the code within the Global concept is executed for all pages.
- A variable called ‘url’ is created and set with the URL of the page where the code is executed
- The code between back ticks ( `-symbol) is JavaScript that is executed in the visitor’s browser (client side)
- All ‘vals’ that are created in this way are included in the DimML pixel request as a query string parameter
- The flow language element is executed after all values for the 'vals' are collected. In this case this is used to output the collected data to the O2MC studio
- The script plugin enables client-side execution of JavaScript code placed between back ticks. This makes it easy to validate that an DimML application is running for a page
Create a new file in the O2MC I/O Studio for a website that has the SLoC installed. Provide the user token as instructed in the instructions on the O2MC I/O Studio installation. Publish the file the test environment assiociated with the user token.
Open the domain associated with the DimML file and add ?dimml={user} to the URL including the specific environment. Open the Javascript console (F12 in Chrome) to open the Developer console. This should show the result of the processing by the DimML application:
Hello World
The console in the O2MC I/O Studio should show this message:
{url=http://www.yourdomain.com/}
Note that the value for URL changes with each new page that is opened.
Content routing
Example of HTML content routing
  @groovy
  concept Html {
    match '*.html'

      plugin html `
      <p>What a nice line of text</p>
      <p>And another one!</p>
      `
  }
Apart from using a DimML application to collect data, a DimML application can also be used to provide content dynamically. To achieve this a DimML application can at run time process process data and dynamically route the user agent to different content. This results in extensive personalisation options. Even with the same URL that is used, DimML can route the request to different content. That means that a web page can have one URL implemented as content on a page, but the content can be different based on the user preference, current weather or any data source imaginable.
The first way to achieve this, is to use the HTML plugin. This plugin allows a user to define HTML code which will be executed the moment the URL is opened. The match rule of the concept can be used to define several different personalised HTML pages in one DimML application
To call the DimML application (without specific headers), the following URL has to be opened:
http://dynamic.dimml.io/content/[hash]/
The hash value of the DimML application can be found by opening the O2MC studio, right clicking on Properties and clicking Publishing API. Several properties and examples are available, the second property Hash is the one that is used for content routing.
The code for a HTML page can be seen to the right.
Content plugin example
@groovy
concept Img {
  match '*.png'

    flow
    => code[img = `"https://unsplash.it/200/300"`@groovy]
    => out

    plugin content `img`
}
Note that opening looking at the match rule in this example, the URL http://dynamic.dimml.io/content/[hash]/page.html will show the HTML code, but http://dynamic.dimml.io/content/[hash]/page.htm will not (since the match is on “.html”).
Apart from HTML code, it is also possible to route the request to specific content. For this the content plugin is used, which requires a field as argument containing the URL to route to. The following code routes the DimML URL automatically to a picture URL, as can be seen on the example to the right.
Encrypting credentials
Distributing data often requires access to third-party systems. DimML source files are used to configure these data pipelines and can contain security sensitive information like passwords. Instead of storing these passwords in clear text, it is also possible to store an asymmetrically encrypted version of credentials that only a specific part of DimML can decrypt.
Some flow elements (e.g. 'sql') can handle encrypted credentials. It is also possible to decrypt the credentials using the 'code' flow element:
concept Global {
    match '*'

    @groovy
    flow
        => code[password = `decryptCredentials('t1KTx3x15bnB5vqhgWlnpuGheTaTmDwIjyNm8md4DN8E7BID6DbLWwZ+d6KdB+eC9+yJA8dfJn80bvgm6bLc6qHzXARs3jimwiSHqJJlPHoN7GqABI2txtNrJ+7I1AthhQZQ+Onzo3EgFcq8FwrvQJ3X0bHa0g4Oqtxiepm3gWkpOcbQ8PMar/30KPW9Y0JVmQ0V9BC+dP8pmGpCRrDcq/jghVTTLJ/yq+t/jtC61QEg5KKM1xULSQudKWA/08Lq1RaobxFeRvNz4iuqJMnzWIZKUCW+M2KPocKLX/S4cZ/q0VSxi+tbHrd+PqhWXhqsbZjjf2+nNC2G8+piKwQ/Jw==').password()`]
        => console
}
The example above will yield 'test' as the password. The decryptCredentials function returns an object with the 'user', 'password' and 'domain' functions, that return the respective values. decryptCredentials is only available from Groovy code.
An encrypted string can easily be created using the DimML Eclipse plugin: - press the right mouse button anywhere in a dimml source file - select 'Encrypt credentials...' - specify any fields that you want to encrypt (all fields are optional) - optionally specify a flow element
Specifying a flow element will restrict decryption to that element only. This can enhance security when the specified flow element does not expose the decrypted information to the other parts of the DimML program. An example that uses this feature to access a database is given below.
concept Global {
    match '*'

    @groovy
    flow
        => sql['select * from metrics order by stamp desc', `db`, batch = '1']
        => console

    const db = `{
        type: 'mysql',
        credentials: 'K89hsLAQRuttB9JO4TxJ+NttzCCXFf83ccGrimtAwU8lSC/UOf9Hx8EnWxkDit/KCF7CkaFFzFXZUBUoY8kkG2FGsbG9a8DAdGM0vTaum19F2wdpPhnkuXxTsLxYVRMJ1Hb3I6TtJiiyRWim0jGHOoRT/441obBFf5dqVgVTiQDFSBNoOO/PYfgUy9dIqkfFf9FQu5cEMxe8ADu5OPjt4YZXABoiNSPTspWaFTEkBnB+6STHMmY+VlSJ+j+48xzY3XaKYdtx1qKP3sUkpt7GjbRgnWQ0ibXN9uPUIM+rRYhiyPRQ4oBlo1OVLXKzwEtjh8siioSJLkc3QH6MaWizWA==',
        databaseName: 'dimml'
    }`
}
The above code will fail because the password is incorrect. But the sql flow element is able to decrypt the encrypted password (it is just an incorrect password). Attempting to decrypt the above key using a 'code' flow element (as decribed earlier) will fail because the 'code' flow is not authorized to decrypt the key.
Note that encrypted credentials can optionally specify a domain/host. The sql flow can use this field to connect to a specific database server.
Algorithm specification
Encrypted credentials are stored as a URI and encrypted with the Dimml public key. The URI takes the form:
creds://user:password@domain?param1=v1¶m2=v2
dimml.js Reference
The Dimml SloC (https://cdn.dimml.io/dimml.js) loads Javascript that exposes some functions through the dimml global js object.
dimml.event(eventName, [dataObject], [scriptName])
Examples
dimml.event('adsLoaded')
dimml.event('click', {x: event.x, y: event.y})
dimml.event('click', {x: event.x, y: event.y}, 'flow')
Send event data to DimML. The eventName should match the name of an event handler (on <eventName> do <code>) in dimml code. The optional dataObject should be an object whose properties are send to DimML (in addition to the 'vals' specified in the dimml code). The optional scriptName allows setting the phase of the request to DimML directly. By default it first loads Javascript that adds code to collect the vals in the concept. By specifying 'flow' as the scriptName this step can be skipped, hence sending the data in the dataObject directly to DimML. This is especially useful when sending data in time-constrained situations like page navigation.
dimml.sha1(string)
Calculates the SHA1 hash of the specified string.
dimml.cookies.get(key)
Returns the cookie value belonging to the specified key or null if it is not found.
dimml.cookies.set(key, value, [ttl], [path], [domain], [secure])
Sets the cookie key to the specified value. ttl specifies the time to live in hours. If it is omitted a session cookie is created. The optional path and domain are used to store the cookie at a specific location. A secure cookie is only transmitted over HTTPS.
dimml.cookies.unset(key, path, domain)
Removes the specified cookie.
dimml.log, dimml.debug, dimml.info, dimml.warn, dimml.error
In most modern browsers these functions will be bound to the Javascript console object. In older browsers they fall back to legacy mechanisms to display debug information in the console.
dimml.load(url, callback)
Loads an external Javascript file. The callback function is executed when the load is complete.
dimml.reload()
Restarts the matching process and executes concepts again.
dimml.safe(fun)
Executes the function in a 'safe' environment. All exceptions are logged instead of thrown.
dimml.ready(callback)
Executes the callback when the DOM is fully loaded.
new dimml.uri(uri)
Examples
new dimml.uri(location.href).query('dimml')
new dimml.uri(uri).path()
var uri = new dimml.uri(location.href);
var path = uri.path();
var queryObject = uri.query();
var dimmlEnv = queryObject.dimml;
Creates a URI object that exposes various functions to retrieve properly decoded URI parts: protocol, username, password, host, port, path, query, fragment. Most functions return a string. The query function returns an object with all query parameters. Alternatively you can specify a specific parameter to return.
Language guide
concept
The concept statement is used to declare a concept and optionally inherit definitions from other concepts. Concepts are used to group logic and perform a specific task defined in DimML code. For each execution, only 1 concept is active and executed (apart from extended concepts). To identify which concept to use, a match statement is used.
In defining data collection logic for a website, it is often the case that some part of the collection process is reused in different places. DimML offers the concept of ‘extending’ or ‘inheriting’ logic to support this reuse.
Example of extending/inheriting logic
    concept A extends B, C {
      ...
    }
As the example to the right demonstrates, a concept can extend more than one other concept. To do so, separate the concepts using a comma (,). When a concept A extends B, all of B’s values, flows and plugins are available to concept A as if they were declared in A. When A and B both define a value or plugin with the same name, the object in concept A is used. The objects in A ‘overwrite’ the objects in B.
If for instance concepts B and C are defined in a functions DimML file, the code would look like this
Example of extending a concept located in a different path
import 'lib/functions.dimml'

concept A extends 'lib/B', 'lib/C' {
  ...
}
const
Constants are defined similarly to fields defined with the val statement. However constants are typically for internal use: they can be used in connection details or similar information, but they are not a part of the data tuple. Furthermore as expected from constants: the value cannot be changed throughout the execution of the DimML file.
Const example
concept Global {
    match `once`@service

    const CPT = 'Global'

    def a = `"The current concept is ${CPT}"`@groovy
    def b = `CPT`@groovy

    flow
    => code[ a = `a()`, b = `b()` ]
    => json
    => console
}
}

// results in the output, note that 'CPT' is not in
{"a":"the current concept is Global","b":"Global"}
Predefined constants
Every DimML application contains the constant _DEV. This constant is a boolean indicating if the application is running in a test environment (any environment that is not production) or not. This is especially usefull for writing a DimML application which for running in test or in production should take different actions. For instance the test DimML application should get files from the test folder, while the production application should use prod. The logic of this example can be combined in the example to the right.
_DEV example
`_DEV ? 'test' : 'prod'`@groovy
def
def function definition example with cookie values
val sessionId = `getCookie('session')`

def getCookie = {name => `
  var i,x,y,cookies = document.cookie.split(";");
  for (i=0; i<cookies.length; i++) {
    x = cookies[i].substr(0,cookies[i].indexOf("="));
    y = cookies[i].substr(cookies[i].indexOf("=")+1);
    x = x.replace(/^\s+|\s+$/g,"");
    if (x == name) { return unescape(y); }
  }
  return false;
`}
To define a function the DimML language uses the def keyword. DimML functions can be written in both client and server side code. They can be called from value collection, flows and other functions. Functions can be inherited and overwritten using concept merging and global scope
Example:
def getQuery = `location.search`
This defines a client side function named getQuery that returns the query portion of the current URI. Writing a function definition on a single line will be interpreted as an expression. A multi-line function definition will expect a function body (e.g. in Javascript this should contain a return statement). You can use the client side function when collecting values:
val query = `getQuery()`
By default code snippets (and therefore also function definitions) are defined in Javascript. To define and execute server side functions, use the @groovy statements:
def getName = `return 'John Doe'`@groovy
val query = `getQuery()`@groovy
For defining a function that takes parameters, the => notation is used. Multiple parameters are separated by a comma. Ergo:
If we have the function
def myFunction = { myArgument, myPunctuation => `return "Hello " + myArgument + myPunctation`}
And we call it like this:
val ubiquitous = `myFunction('world', '!')`
then ubiquitous will now contain the string
Hello world!
Client-side functions
plugin script `
  console.log('the session cookie is: '+getCookie('session'));
`
Example of using a server side function inside a flow
val url = `location`

flow
  => select[`url.size() > 200`@groovy]
  => code[query = `getQuery(url)`@groovy]
  => json
Client side functions can also be called from various plugins. For instance, the script plugin allows you to attach any Javascript code to a concept (this code will end up in the browser when concept is triggered). Functions are also supported there.
events
Event example
concept Global {
  match '*'

  event click = `window.click`
}
Acting on client-side events allows fine-grained control over data collection and processing. Handling these events in DimML consists of two parts: Declaring the event using the event statement, and defining the appropriate logic when the event occurs.
Defining an event in concept-scope will cause the client-side handler to be registered for that particular concept only (only if also an on event statement is defined, otherwise nothing is done).
Event in global scope
Event defined in global scope
event click = `window.click`

concept Global {
  match '*'
  ...
}
An event can also be defined in global scope. This will associate the event with every concept in scope:
Event expressions
Event example: show link url in the javascript console when hovering mouse over a link
event overLink = `document.getElementsByTagName('a').mouseover`
              => `{destination:it.target}`

concept Global {
  match '*'

  on overLink include {
    flow => debug
  }

  plugin debug
}
Event expressions consist of two parts. The part before the last dot (.) is the selector and after the dot is the event name. The selector defines an element on the page. The event name defines at what interaction on the element a DimML event should be triggered. In the example above the selector is ‘window’ and the event name ‘click’. Some more examples:
event buttonClick = document.getElementById('button').click
event overLink = document.getElementsByTagName('a').mouseover
event exitLink = $('a.ad').click
The selector can be a regular HTML DOM element, a list of DOM elements or a jQuery selector.
Furthermore an event definition can be extended with a function. The event will then only trigger when the expression evaluates to ‘Javascript truthy‘. Inside the function, the element that triggered the event can be accessed using ‘it‘ as a reference.
on … do / include
Event with on...do
event overLink = `document.getElementsByTagName('a').mouseover`
               => `{destination:it.target}``

concept Global {
  match '*'

  val main = 'true'

  on overLink do CollectLink
}

concept CollectLink {
  val link = 'true'

  flow => console
}
Results in : {link=true, destination=http://www.dimml.io/downloads.html}. While using the exact same code and only changing do CollectLink to include CollectLink will result in
{main=true, link=true, destination=http://www.dimml.io/downloads.html}
As shown in the last example, the ‘on‘ keyword is used to specify an action when a DimML event occurs. When ‘include‘ follows the name of the event, any logic defined in the enclosing concept is used as well. Alternatively ‘do‘ can be used instead of ‘include‘, which omits the details of the parent concept. An example of this can be seen to the right.
flow
Flows are used to declare data processing and export steps as a directed graph. Flows can only be used inside a concept. As input for the flows the values for all the variables (vals) are available.
Flows statements can also contain a name between brackets. The name between brackets identifies the bucket that functions as the source of data. The ‘default‘ bucket is a special bucket that contains the data collected through val definitions. If no bucket is specified the ‘default‘ bucket is assumed (as you can see in the first flow example). Furthermore you can point from any flow to any other flow and multiple flows. As a results DimML allows you to quickly create multiple data streams. In the example below you can see how the previously defined flow results in 2 additional flows
Example of multiple data flows
concept all {
   match '*'
   val pagename = 'home'

   flow
   => code[views = '1'] (debug)
   => json (ftp)

   flow (debug)
   => console

   flow (ftp)
   => ftp[
    host = 'localhost',
    user = 'user',
    password  = '123456789',
    dir = '/tmp/upload',
    flush = 'true'
     ]
}
It is also possible to send the output of a flow to multiple destinations (with different flow names). For instance the DimML code below will format the data tuple and continue with two different flows.
flow => json (goto-1) (goto-2)
This notation is particularly usefull for the if flow element.
Parameters
Several flow elements may need parameters. These parameters contain string, regular expressions or code snippets. They should be separated with a comma (,) and can optionally be named. Note that only server side code is allowed because the flows are executed server side. By default server-side Javascript is used for the code snippets in the flow elements. If you want to use groovy, you can add @groovy after the last backtick. Parameters are placed within square brackets.
Example of flow with parameters
concept all {
   match '*'

   val pagename = 'home'

   flow
   => select[`typeof(pagename) != 'undefined']
   => code[views = '1', pagenamelength = `pagename.size()`@groovy]
   => filter['pagename','pagenamelength','views']
   => csv[mode = '1']
   => console
}

// results in the following code in the console:
home;4;1
import
The import statement is used to import other DimML files. DimML borrows ideas from aspect-oriented programming to support the separation of these aspects into distinct DimML files.
Whenever the DimML platform receives a request from a webpage, an attempt is made to discover DimML files that are relevant to the page. The default behavior is to use the domain of the request URL to create a list of relevant DimML files. For instance, assuming the domain is www.example.com the list would be:
- example.com.dimml
- .www.example.com.dimml
- .example.com.dimml
- .com.dimml
Any missing files are skipped. The remaining files can include import directives that will add additional DimML files to the end of the list like this:
import 'customer/settings.dimml'
The DimML platform loads and merges the files in the order specified.
Each DimML file is identified by an absolute URI.
Imports refer to other DimML files using relative or absolute URIs. If the previous import statement is a part of /prod/www.example.com.dimml, the DimML file that will also be loaded as a result of the import is /prod/customer/settings.dimml.
Imports can only be done on a global level (not within a concept). How the content of the different DimML files is merged is described in the concept section.
language
A big part of the DimML language is the use of code snippets written in non DimML code. The snippets are enclosed by backticks. DimML can interpret these snippets written in different programming languages, currently Groovy, client side Javascript and server side Javascript. The default language differs by language element:
client side javascript:
- val
- const
- def
server side groovy:
- flow elements
- plugins
This means that
val url = `document.location.href`
will run in client side javascript. While
flow => code [page=`url`]
will run in groovy.
The default language can be overwritten for a specific code snippets by adding either @groovy, @javascript or @dimml for Groovy, client side Javascript and server side Javascript respectively after the closing backtick of the code snippet.
@groovy

def fun1 = `...` // groovy

concept A {
  val v1 = `...` // groovy

  @javascript
  val v2 = `...` // javascript
  def fun2 = `...` // javascript
}

def fun3 = `...` // groovy
Note that not all overwrites are possible; if the execution takes place on the server for instance, client side scripting is no longer possible.
For example
val url = `getURL()`@groovy
will define a val which gets its value using Groovy exection.
The default language can also be changed between statements in a dimml file or concept. The new default language is set from that point forward until the scope ends. The code to the right illustrates that.
match
URL matching
Matching page URLs to a concept can be done using a combination of various match instructions. They are combined using an or operator. The asterisk (*) wildcard is used for any number of characters (similar to the file system wildcard).
Example of a simple match using wildcards.
concept A {
  match '*/index.html'
  match '*/welcome.html'
}
A match statement is first split into its URI components: scheme, authority, path and query. For example:
match 'http://example.com/products/books?size=large'
The components will be:
- scheme: http`
- authority: example.com`
- path: /products/books
- query: ?size=large
The interpretation is that a specific URI will match this rule if and only if:
- it’s scheme equals ‘http’
- it’s authority equals ‘example.com’
- it’s path equals ‘/products/books’
- it’s query string contains at least one ‘size’ parameter with value ‘large’
Relative URIs are also allowed (eg. /products/books, //example.com, ?size=large, etc.). When a relative URI is used in the match expression, matching will only occur on the components that are present. For example:
match '/products/books'
will match all of
https://example.com/products/books#ch1http://audacis.org/products/books?user=davidblabla://david:password@blabla/products/books
Matching is done by traversing each of the file and checking each concept and match statement. This is done in order of loading and importing the files and the sequence top to bottom of the concepts. If a match can be made, the concept is chosen as the one use for the specific request.
Query matching
Matching on the query component of a URI works differently. The query component of a match expression is split into its parameters. The interpretation is that these parameters should be present in the target URI to match, but not necessarily in the same order. When the value is omitted, the parameter is only tested for its presence and it can have any value. For example:
match '?size=large&user'
will first be split in its URI components (only a query component) and then into its query parameters:
size = largeuser =
This will match
http://example.com/products/books?user=david&size=large
It will not match
http://example.com/index?size=small&user=david
Service matching
DimML applications are typically consumers: they act when called upon (e.g. when a page is opened). However it is also possible to start a data stream from initiated by DimML itself. These are called DimML services. The use of services (producer) requires 3 changes to a consumer DimML application:
- The DimML file is not written for a specific domain, so any name can be used
- The extension should be changed to .service (in stead of .dimml)
- The match rule should include the schedule at which the DimML file will execute
Example service matching with cron
concept CheckDB {
  match `0 0/5 * * * ?`@cron

  flow
    => sql['...', `DB`, batch = '1']
    => select[`field < 0`@groovy]
    => ...
    => mail[`MAIL_OPTIONS`]
}
The DimML application to the right will run (once) every 5 minutes, perform a look up into the database and send an email if a certain condition is met. As you can see, the match statement is written as code snippet (between backticks). To avoid the interpretation of this code snippet as Javascript, the @cron statement is added. This is the only correct use of @cron.
Example of an extensive schedule
concept CheckDB {
  match `0 30 10-13 ? * WED,FRI`@cron

  flow
  => ..
}
This will trigger a DimML service at 10:30, 11:30, 12:30, and 13:30, on every Wednesday and Friday.
By default all services have a limited lifetime (to prevent forgotten services that run perpetually). Services defined in the sandbox have a lifetime of 1 hour, development services have a lifetime of 1 day and production services have a lifetime of 1 year.
A special schedule is the ‘producer’ schedule:
match `keepalive`@cron
This schedule sends a pulse every few minutes to the first flow element in the default flow(s). It is used to keep ‘producer’ flows alive. A producer flow element does not require input data but is allowed to emit data down the flow whenever it is available. An example is the twitter flow
Prematching
Example $preMatch: Wait for 1 second before matching
def $preMatch = {doMatch => `
    setTimeout(doMatch,1000);
`}
Example $prematch : Wait (polling) for the availability of some javascript library
def $preMatch = {doMatch => `
    var handle = setInterval(function(){
        if (window.jQuery) {
            clearInterval(handle);
            doMatch();
        }
    },100);
`}
Example $prematch: Wait for the availability of some javascript you can edit
def $preMatch = {doMatch => `
    if (window.myLib) {
        doMatch();
    } else {
        window.dimml.doMatch = doMatch;
    }
`}
In the other javascript lib:
if (window.dimml && window.dimml.doMatch) window.dimml.doMatch();
Example: Match multiple times to select a concept based on client-side events
def $preMatch = {doMatch => `
    var handle = setInterval(function(){
        if (!window.s_c_il || !window.s_c_il[0] || !window.s_c_il[0].t)
            return;
        var s = window.s_c_il[0];
        s.tttt = s.t;
        s.t = function(){s.tttt();doMatch();}
        clearInterval(handle);
        doMatch();
    },250);
`}
The special function $preMatch allows interaction with the client-side matching process. It can only be defined within the global scope of a DimML file; it has no effect when defined inside a concept. The signature of the function definition is:
def $preMatch = {doMatch => `...`}
Note that as in other DimML elements backticks (`) are used for code snippets. By defaults the code snippets contain Javascript but other languages can be used as well (see val statement for more explanations). Prematching can only be done using default Javascript code snippets.
Control over when the matching process (for this particular DimML file) should start and select a concept is relinquished to the $preMatch function. The doMatch parameter is a callback function that should be executed when the matching process should select a concept. Some examples can be found to the right.
val
The val statement declares the collection of values (either client or server-side). The val statement is only valid inside a concept. Each val statement is executed in parallel with the other val statements; no sequence is defined.
val type = 'example'
A val statement can also be assigned code, by means of backticks. These backticks are used for other DimML elements as well (def, plugins, etc.). The backtick can be extended with an @ to define which programming language the code to use for parsing and executing. By default client-side Javascript is used. Therefore
val url = `document.location.href`
is the same as
val url = `document.location.href`@javascript
Furthermore you can call functions (see def statement) which are defined in the DimML file as well. If for example you have defined a function in groovy to define the page name, the (server-side) val statement would look like this
val pagename = `getPageName()`@groovy
version
Version example
version '2.2-adversitement'
Optional element to specify a target platform and version of the DimML code that is used. When present this should be the first element in a DimML file. Though all platform servers can send requests to all connected servers, adding a version immediately points the file to the right server.
Flow Steps
Basic Processing
addjson
Example
concept Example {
    flow
        => code[j = '{"a": "foo", "b": 133}']
        => addjson['j']
}
Result (given we start with {a:"foo", b: 133} as object):
{ j: {"a": "foo", "b": 133}, a: "foo", b: 133 }
Parse a JSON object string and add the elements as fields to the data tuple.
Description
Given a Field parameter, parse the field’s content in the input tuple as a JSON object string and add the key-value pairs as fields to the output tuple.
Parameters
| Name | Type | Description |
|---|---|---|
| field | identifier | JSON object string identifier |
References a field available in the input tuple.
Input
The field referenced by the Field parameter should be available in the input tuple.
Output
The output tuple contains the key-value pairs from the JSON object string as fields.
Remarks
- JSON object string should be well-formed.
- Nested objects and arrays are parsed and returned as maps and lists respectively.
aggregate
Aggregate example
concept Example {
    val url = `document.location.href`
    flow
    => bucket['10s']
    => aggregate['url',views='count url']
}
Keeps track of the views for each opened url for a duration 10 seconds per url.
Run a single aggregation step on the collection of input tuples.
Description
Aggregate takes a set of tuples as input and aggregate the results into 1 tuple. Additionally add new fields which use the functions count, sum or avg on any of the existing fields
Parameters
| Name | Type | Description |
|---|---|---|
| fields | List of fields | The fields for which the data is grouped |
References fields available in the input tuple or extension on top of them
Input
The fields referenced by the List of Fields parameter should be available in the input tuple. Futhermore new fields can be defined which are the result of function on top of the existing fields
Output
The output tuple for each unique occurrence of the values in the List of Fields
Bucket
Bucket example
concept Example {
    val url = `document.location.href`

    flow
        => bucket['10s']
        => aggregate['url',views='count url']
}
This will collect the url for each page opened and aggregate the data based on that value. After 10 seconds for each unique url a tuple will be generated which will also contain the views field. This field contains the number of times the url has occurred.
Convert a stream of tuples that arrive in a predefined time slot to a single collection of tuples.
Description
Convert a stream of tuples that arrive in a predefined time slot to a single collection of tuples. Guaranties the timely delivery of the output collection if at least a single tuple has arrived in the time slot.
Parameters
time – Time slot for collecting tupless
The postfix time notation uses ‘ms’ for milliseconds, ‘s’ for seconds, ‘m’ for minutes, ‘h’ for hours and ‘d’ for days.
Input
No specific requirements
Output
All tuples of the input stream
buffer
Buffer example
concept Example {
    val url = `document.location.href`

    flow
        => buffer['10s']
        => aggregate['url',views='count url']
}
This will collect the url for each page opened and aggregate the data based on that value. After 10 seconds for each unique url a tuple will be generated which will also contain the views field. This field contains the number of times the url has occurred.
Convert a stream of tuples that arrive in a predefined time slot to a single collection of tuples. The only guaranty is that of eventual delivery of the output collection.
Description
The buffer element takes a single unnamed parameter that defines the minimum time to buffer tuples. The buffer tries to send the data as soon as possible, but makes no guarantees. The data is send as a single list of tuples and stamped with the current time as packet time. This time can be retrieved using the time element..
Parameters
| Name | Type | Description |
|---|---|---|
| time | String | Postfix time notation for collecting tuples. The postfix time notation uses ‘ms’ for milliseconds, ‘s’ for seconds, ‘m’ for minutes, ‘h’ for hours and ‘d’ for days. |
Input
No specific requirements
Output
All tuples of the input stream
buffer:aggregate
Buffer:aggregate example
Example

concept Example {
    val url = `document.location.href`

    flow
        => buffer:aggregate['10s','url',views='count url']
}
This will collect the url for each page opened and aggregate the data based on that value. After 10 seconds for each unique url a tuple will be generated which will also contain the views field. This field contains the number of times the url has occurred.
Perform aggregation as a streaming step on input data that arrives in a specific time slot
Description
This element combines both the buffer and the aggregate flow elements into one element
Parameters
| Name | Type | Description |
|---|---|---|
| time | String | String with postfix time notation for the time slow |
| fields | list of fields | the fields for which the data is grouped |
The postfix time notation uses ‘ms’ for milliseconds, ‘s’ for seconds, ‘m’ for minutes, ‘h’ for hours and ‘d’ for days. References fields available in the input tuple or extension on top of them
Input
The fields referenced by the List of Fields parameter should be available in the input tuple. Futhermore new fields can be defined which are the result of function on top of the existing fields
Output
The output tuple for each unique occurrence of the values in the List of Fields
buffer:session
Buffer:session example
concept Global {
  match '*'

  def guid = `dimml.sha1(+new Date()+Math.random().toString(36).slice(2)+navigator.userAgent).slice(20)`

  val url = `location`
  val sessionId = `sessionStorage.dimmlsid=sessionStorage.dimmlsid||guid()`

  @groovy
  flow
    => buffer:session['sessionId', timeout = '30s', `
      session.startPage = session.startPage?:url
      session.endPage = url
      session.pageCount = (session.pageCount?:0)+1
      false`]
    => console
}
This will collect the url for each page opened and the data based on the session ID. After 30 seconds for each unique url a tuple will be generated which will execute the code defined in the body. Since the startpage is stored only for the first tuple (and unchanged after that), it contains the first page of the visit. Similarly since the endPage parameter is updated for each new tuple, it will contain the URL of the last page of the visit. Finally the pagecount parameter is incremented with each page view. Since false is added to the body, no input tuples will be send to the next code element. Only 1 tuple will be send to the next code element, containing all session parameters. If for this DimML application first the URL http://documentation.dimml.io is opened followed by http://documentation.dimml.io/basic-syntax, the output tuple will be
{startPage=http://documentation.dimml.io, endPage=http://documentation.dimml.io/basic-syntax, pageCount=2}
Collect input tuples until a user session ends.
Description
This element buffers input tuples them using a session id. Apart from the session id, a time out can be defined after which the session has ended. The body of this code element can be used to perform additional calculation on the input tuples such as storing data in the session object. The body is executed at the moment the input tuple reach the code element. If the body returns false, the input tuple is discard. This is particularly convenient for calculting properties of a session both only storing them at the end of the session when the session expiration took place. All fields of the session object will be available as fields in the resulting flow
Parameters
| Name | Type | Description |
|---|---|---|
| time | String | String with postfix time notation for the time slow |
| sessionId | String | Value which is used to aggregate the data |
The postfix time notation uses ‘ms’ for milliseconds, ‘s’ for seconds, ‘m’ for minutes, ‘h’ for hours and ‘d’ for days. The session id refers
Input
The fields referenced by the List of Fields parameter should be available in the input tuple.
Output
Based on the use of false, a number of input tuple after the expiration as defined as field. Furthermore additional fields might be available
call (improve)
Call example
concept Example {
    match '*'
    val a = `3.0`@groovy
    val b = `4.0`@groovy

    flow
    => call[`Functions:pythagoras`@dimml]
    => debug

    plugin debug
}

concept Functions {
    flow (pythagoras)
    => code[`Math.sqrt(a.power(2) + b.power(2))`@groovy]
}
This will result in the following tuples:
{b=4.0, a=3.0, c=5.0}
Execute a specified flow on the input tuple
Description
Send the input tuple to a target flow and forward the resulting output. The target flow can be defined in a separate concept, possibly in a separate file. This effectively sends the data to a flow in another concept, executes that concept, and returns the result.
Parameters
target (code) – Description of the concept and flow to be executed
Input
No specific requirements
Output
The output of the called flow given the current input tuple. Example
The called target flow must be available, and thus be included somewhere if it is defined in another file. Calls to the target flow share the same execution concept. Specifically, this means that calls to the same target flow from different places can be combined. The call flow elements can be used to simulate function calls. This means the function flows can be included in arbitrary flows, so the content of the input tuple is uncertain and performing desired checks is recommended. For example, in the pythagoras flow you might want to verify that both a and b are present and numeric.
catch (stub)
code
Code example
concept Example {
    match '*'

    val browser = 'Mozilla/5.0 (Windows NT) Firefox/36.0'

    flow
        => code[
            ie = `ua.contains('MSIE')`,
            firefox = `ua.indexOf('Firefox')>=0`@groovy
        ]
}
This will result in the following tuple:
{ browser: Mozilla/5.0 (Windows NT) Firefox/36.0, ie: false, firefox: true }
Add values to the data tuple based on specified script code.
Description
Define new fields based on client side or server side code.
Parameters
List of assignments – Scripts to define a value for a field
Each assignment contains an expression which is assigned to a field. This script can either be in Javascript (default, executed client side) or Groovy (executed server side). For the later, add @groovy after the script text.
Input
No specific requirements
Output
The data tuple is extended each field defined in de code element
compact
Compact example
concept all {
    match '*'

    val firstName = 'John'
    val lastName = 'Doe'

  flow
    => compact['map']
    => console
}
This will result in the debug plugin showing the following text in the console: {lastName=Doe, firstName=John, map={lastName=Doe, firstName=John}}
Add a new field to the data tuple that contains a map of the current fields as value.
Description
Add a field called ‘compacted’ to the tuple that contains a (unmodifiable) map view of the tuple. The default field name can be overridden
Parameters
Field – Optional: field which the contains map
Input
No specific requirements
Output
An additional field with a map as specificed
console
Console example
concept Hello {
    flow
    => code [message = `'Hello'`]
    => console
}
Returns the following in the console:
{ message: Hello }
Description
Outputs the current working set of tuples into the connected console.
Parameters
None
Input
None
Output
Overview of current data.
csv
Convert the data tuple to a CSV representation.
Description
Csv example
concept Example {
    match '*'

    val firstName = 'John'
    val lastName = 'Doe'

    flow
    => filter['firstName','lastName']
    => csv[mode='1']
    => debug

    plugin debug
}
This will result in the debug plugin showing the following text in the console:
John;Doe
Convert the data tuple to a CSV representation.
Parameters
Mode – field seperator
An alternative mode of operation can be selected using the mode=’1′ parameter. This will use the semicolon (;) as separator, no double quotes to escape data, escape any semicolon in the data (using \;)
Input
No specific requirements
Output
Csv example 2
concept Example {
    match '*'

    val firstName = 'John;the one and only'
    val lastName = 'Doe'

    flow
    => filter['firstName','lastName']
    // the value of all fields are put in the serialized field,
    // and then every occurence of the the semicolon is replaced
    => compact['serialized'] => code[serialized = `serialized.values()*.replace(';','').join(';')`]
    => debug

    plugin debug
}
This element will output a new tuple with a single field called ‘serialized’. This field is of type String and contains the CSV formatted data of the input fields. Note that all output flow elements use this serialized field by default as input. The delimiter is a comma (,). All data is escaped using double quotes.
Note that there is no predefined sequence in which the values are shown. Should this be required, use the filter element
Additionally it is necessary that the separator that is used does not occur in the values for the fields. Since any use of the files and separating the columns will result in a different amount of identified values. E.g. in the first example the firstName field could contain a comma (e.g. John,the one and only). The output would then be
John;the one and only;Doe
Processing this data would cause challenges since the additional comma results in 3 fields being identified (or the one and only as last name). Therefore it is advised to filter out any occurrences of the separator in the field values. The code in example 2 does that for the semicolon.
debug
Debug example
concept Example {
    match '*'

    val firstName = 'John'
    val lastName = 'Doe'

    flow
    => filter['firstName','lastName']
    => csv
    => debug

}
Send the data tuple to the Javascript console.
Description
Data will pass through the ‘debug’ element unaltered. This allows the use of debug anywhere in a flow to get a peek of the data passing through. This element should be combined with the ‘debug’ plugin to make its output visible in the Javascript console.
Parameters
None
Input
Uses the ‘serialized’ field which contains a string to be shown
Output
No changes to the data tuple
delay
Delay example
concept Example {
    match '*'

    val a = 'a'

    flow
        => delay['30s']
        => debug

    plugin debug
}
Output after 30 seconds in the console:
{a=a}
Delay each input tuple for a specified amount of time
Description
For each input tuple, wait for the amount of time specified by the delay parameter before outputting it.
Parameters
delay (string) – Amount of time tuples are delayed
Input
No additional requirements
Output
No changes to the data tuple, though the flow is continued later (the delay)
drop
Drops a tuple from the flow, effectively ending that flow without returning anything.
flow
 => code[test = `"Hello"`]
 => console
 => drop
 => console // will not get executed
expand
Expand example
concept all {
  match '*'

  flow
  => code[map= `["a":1,"b":1]`@groovy]
  => expand['map']
  => debug

  plugin debug
}
This will result in the debug plugin showing the following text in the console:
{map={a=1, b=1}, a=1, b=1}
Interpret the data tuple as a map and include its fields in the current data tuple.
Description
Interpret the data tuple as a map and include its fields in the current data tuple.
Parameters
Field – Optional: field which contains the fields as a map
Input
If no field is defined, the field ‘expanded’ will be use. The Field that is used has to be of type map. Therefore it is the map alternative to addjson, which uses a string as input field
Output
Each item in the map is added as a field to the data tuple.
filter
Filter example
concept Farm {
    flow
    => code [`[ 'duck', 'dog', 'cat', 'apple' ]`]
    => nop (duckdog) (removefruit)

    flow (duckdog)
    => filter [ 'duck', 'dog' ]
    => console

    flow (removefruit)
    => filter [ '-apple' ]
    => console
}

> Result:
    {[ duck, dog ]}
    {[ duck, dog, cat ]}
Description
As the name suggests, filter applies a filter on the given tuples. A filter can only be inclusive ['dog'] or exclusive ['-apple'] in one call, but may have multiple tuple filters at the same time.
So ['dog', 'cat'] is a valid filter. ['-cat', '-apple'] is as well. But ['dog', '-cat'] is not.
Parameters
| Name | Type | Description |
|---|---|---|
| names | List of Strings | A list of names of keys which should be filtered |
Input
All current tuples
Output
Depending on the used filter, either:
- Only the tuples defined in the
filterparameters
Or
- All the tuples, except for the one defined in the
filterparameters
for .. next
Example for .. next
=> for[i = `0..5`@groovy]
=> console
=> next
This will output tuples {i=0}, {i=1}, {i=2}, {i=3}, {i=4} and {i=5} to the console.
Loop over a bounded collection.
Description
The for and next steps enable looping over a bounded collection. The collection or array is specified in the for step as a single parameter where the field name is the bound variable and the code block returns the collection to loop over.
For loops have a long tradition in imperative programming languages. Since tuples contain all the state required to execute the next steps, the runtime properties of a for loop are different than those found in other languages. For one, the execution of the next step is optional. The for step only sets up the required state for a next step to know what to do.
No state in for loop runs
=> code[a = `1`]
=> for[i = `5..7`@groovy]
=> code[a = `a+i`]
=> console
=> next
=> console
This will output tuples {a=6, i=5}, {a=7, i=6}, {a=8, i=7}, {a=1}
The next step looks up the last registered for loop, advances the index in the collection and the flow executes as if the for step was the previous step. By default there is no state available from the previous loop run. When the collection used in the for loop has been completely exhausted the next step will resume normal execution using the tuple state from before the for step.
To keep state in loop runs, replacing next in previous example:
=> next[`[a:a]`]
This will output tuples {a=6, i=5}, {a=12, i=6}, {a=19, i=7}, {a=19}.
To keep state in between loop runs, you specify the context to carry over as a code block in next step. This code block should return a map/object and the next step will make it available as tuple fields in the next loop run or the termination of the loop.
Akin to a break statement in imperative loops you can prematurely terminate a loop by setting a 'next' field to false in the context that you carry over in the next step.
Set next to false when you want to terminate the loop
=> next[`[a:a, next: a<10]`]
This will output tuples {a=6, i=5}, {a=12, i=6}, {a=12}.
Nesting for loops is also possible. There is nothing special about the second next step in nested for loops. The reason why it operates on the 'outer' loop is that after the first next terminates the resulting tuple is based on the tuple as it arrived at the second for step. It no longer contains information about the second loop.
Nested loops
=> for[i = `0..2`@groovy]
=> for[j = `0..2`@groovy]
=> console
=> next
=> next
This will output tuples {j=0, i=0}, {j=1, i=0}, {j=2, i=0}, {j=0, i=1}, {j=1, i=1}, {j=2, i=1}, {j=0, i=2}, {j=1, i=2}, {j=2, i=2}.
Since there is nothing special about the second next step, there is no way to 'jump' out of the inner loop and skip to the next element in the outer loop (aside from using the 'next' field in the context as described above and terminating the inner loop). You can optionally specify the bound variable, of a for step, in the next step by name. The second next step would be next['i'], referring to the bound variable of the outer loop.
Nested loop with bound variable
=> for[i = `0..2`@groovy]
=> for[j = `0..2`@groovy]
=> console
=> if[`j>Math.random()*2`] (next_i)
=> next
=> (next_i) next['i']
Random output like {j=0, i=0}, {j=0, i=1}, {j=1, i=1}, {j=0, i=2}, {j=1, i=2}
Parameters for
| Name | Type | Description |
|---|---|---|
| [varname] | codeblock | Set a bound variable iteratively to the elements of a collection or array that is the result of evaluating the code block |
Output for
The input tuple with the bounded variable field set to the current value in the collection of the for loop.
Parameters next
| Name | Type | Description |
|---|---|---|
| <anonymous> | codeblock | Returns a map/object containing context variables that should be carried over between for loops and after termination of the loop |
| <anonymous> | string | The name of a bound variable used in identifying which for loop this next step should act upon |
Output next
The result after termination of the loop, either because the collection has been exhausted or because the 'next' field in the context map/object was true.
if
If example
flow
=> if[`beer == 'Heineken'`] (no-heineken)
=> ftp[..]

flow (no-heineken)
=> sql[..]
The expression in the if flow element in this example evaluated whether the beer parameter is set to a specific value. If this is the case, the flow is continued as defined (an no other flows are initiated). In this case the FTP element is executed. If the expression is not true, the no-heineken flow is initiated and the current flow stops (nothing is sent by FTP). With all of the current data in the data tuple the SQL element is executed.
Continue in the current data stream only if a condition is met.
Description
The if flow evaluates an expression and continues with the flow if the expression evaluates to true. If the evaluation evaluates to false, all named flows provided with the if flow element are executed.
Output
The current flow is continued or stopped based on the evaluation of the expression
ip
Ip Example
concept Example {
    match '*'

    flow
        => ip
        => debug

    plugin debug
}
Output:
{ip=81.30.41.185}
Add the visitor’s IP address to the data tuple.
Description
The ip flow adds the IP address attached to the current tuple’s original HTTP request as a field named ip to the data tuple. Note that some flow elements might make it impossible to access the original request, notably aggregation flows and the join flow.
Output
ip(string) – The IP address of the current tuple’s original HTTP request.
Remarks
Some flow elements might make it impossible to access the original request, notably aggregation flows and the join flow.
join
Joins all tuples into a single tuple, containing a map of all tuples.
join example
flow
=> code[test = `["foo","bar"]`]
=> split['test'] // we now have two separate tuples: {test=foo}, {test=bar}
=> join
=> console // outputs: a map containing two tuples: [ {test=foo}, {test=bar} ]
json
JSON example 1
concept Example {
    match '*'

    val a = 'a'
    val b = `1`

    flow
        => json
        => console
}
Output:
{"b":"1","a":"a"}JSON example 2
concept Example {
    match '*'

    val a = 'a'
    val b = `1`

    flow
        => json['c']
        => console
}
Convert all fields in the data tuple to a JSON representation.
Description
Takes the input tuple and converts it to JSON. No escaping is performed. By default, the output tuple contains a single field called serialized, containing the JSON representation of the input fields. It is also possible to specify a field name as a parameter, in which case that field is added to the tuple, containing the JSON representation of the input fields.
Parameters
| Name | Type | Description |
|---|---|---|
| field | string | Field name in which the JSON result will be stored |
Output
If the json is used without a parameter:
| Name | Type | Description |
|---|---|---|
| serialized | string | JSON object string of the input tuple's fields |
If the field parameter is used:
| Name | Type | Description |
|---|---|---|
| field | string | Field name in which the JSON result will be stored |
Output:
{b=1, a=a, c={"b":"1","a":"a"}}
Remarks
- No escaping is performed.
- The fields in the JSON object string are in arbitrary order
pattern
example pattern
flow
    => session['sessionid']
    => pattern[previous = 'Global', current = 'Global']
Recognize patterns of concept access and make the collected information from those concepts available.
Description
The pattern element requires the presence of a ‘session’ field in the input tuple to operate. This field should expose ajava.util.Map that can be used to store session related data on the server (see the session element). Concept access will be recorded in the session. An output tuple will only be produced when a matching pattern is discovered. The output tuple will contain all the fields of the input tuple plus any named parameters.
In the example an output tuple will be produced when two Global concept accesses occur and the last access is the current request. Since both parameters in the example are ‘named’ (namely ‘previous’ and ‘current’), these fields will be added to the output tuple. They contain a reference to the data collected for these concepts when they reached the pattern element in the past.
concept Global {
    val url = `location`
    val sessionid = `dimml.cookies.get('session')`

    flow
        => session['sessionid']
        => pattern[previous = 'Global', current = 'Global']
        => select[`previous.url.contains('/orderform.html')`@groovy]
        => ...
}
This will collect the values ‘url’ and ‘sessionid’ on the client and start flow processing. First a ‘session’ field is added containing a server-side session based on the ‘sessionid’ field. Then pattern matching is executed to detect the occurence of two ‘Global’ concept accesses. Then only those matches are selected where the ‘previous’ access was for a page that contained ‘/orderform.html’ as part of the URL.
property (stub)
purpose (stub)
route (improve)
Route example
@groovy

concept Route {
  match '*'

  val data = `['A', 'B', 'c']`

  flow
    => split['data']
    => route
    => console
}

concept A {
  match `data == 'A'`

  flow
    => out
}

concept B {
  match `data == 'B'`

  flow
    => code[msg = 'this is from B']
    => out
}
The route flow enters a server-side matching step. It uses match statements that contain server-side code (e.g. @groovy, @dimml, @python) to select a concept whose flow is used for further processing. It specifically skips plugin processing in the target concept. The routing step respects server-side vals defined in the target concept.
When the target flow returns a value (i.e. contains an 'out' element), the call to route returns as well. Otherwise the original flow stops executing after route.
In this example there are 3 tuples entering the route step: {data='A'}, {data='B'} and {data='C'}. The first tuple is sent to concept A and the second tuple to B. The last tuple does not match any target concept (this is perfectly valid). concept A simply return the same tuple, B adds a message. The output is something like this:
    {msg=this is from B, data=B}
    {data=A}}
Multi-matching is possible by having more than one file with server-side match statements. One concept can be selected from each file.
$prematch
route example with $prematch
def $preMatch = `data>='B'?data.toLowerCase():null`
The $preMatch is now also available as server-side pre-matching selector. If the returned value is null or false, matching will not continue for that file. Otherwise the returned value can be used in the matching code as the variable value.
This preMatch function is executed before any match expression in the code is evaluated. The result can be used in a match expression.
route example with $prematch, using a match expression
match `value == 'c'`
sample
Example
=> sample[`"${elementId} ${(System.currentTimeMillis()/1000) as Long}"`]
This creates a unique combination of the elementId variable and the current time in seconds.
Samples data, taking snapshots of tuples at certain intervals, instead of processing all data. [wikipedia]
Parameters
| Name | Type | Description |
|---|---|---|
| identifier | codeblock | Logic which evaluates to a unique key which can be used to identify similar tuples over time. Unique identifiers are never kept for more than 10s. Look at this as the cache key name used to identify similar tuples. |
select
Select example 1
concept Example {
    match '*'

    val a = 'a'

    flow
        => select[`a == 'a'`@groovy]
        => debug

    plugin debug
}
Output:
{a=a}Select example 1
concept Example {
    match '*'

    val a = 'a'

    flow
        => select[`a == 'b'`@groovy]
        => debug

    plugin debug
}
Output: Empty
Drop tuples when they do not match a specified expression.
Description
Evaluates an expression for every incoming tuple. The input tuple is dropped when the expression evaluates to false. In the expression, all fields in the input tuple can be accessed as local variables.
Parameters
expression(code) – The code expression to evaluate incoming tuple
Output
The output tuple is equal to the input tuple if the expression evaluates to true. If the expression evaluates to false, the input tuple is dropped and there is no output.
Remarks
- All fields in the input tuple can be accessed as local variables in the expression.
session
Make a session object available to the data tuple. The session will be linked to a session id that should be present in the data.
=> session['sessionid']
A server-side session is a concurrent map that is made available to subsequent flow elements. Every distinct value of the field specified as a parameter will result in a distinct session. Sessions are guaranteed to remain alive on the server for at least 15 minutes of inactivity. The default name of the session object is ‘session’. This can be overwritten by providing a named parameter:
=> session[sessmap = 'sessionid']
Parameters
| Name | Type | Description |
|---|---|---|
| sessmap | string | Name of the session object |
split
Split example
concept Example {
    match '*'

    val a = 'a'
    val i = `[1, 2, 3]`@groovy

    flow
        => split['i']
        => debug

    plugin debug
}
Output:
{a=a, i=3} {a=a, i=1} {a=a, i=2}
Split the input tuple in multiple output tuples based on a single field that should contain an iterable value.
Use an iterable field in the input tuple, to generate multiple similar output tuples. Every output tuple has the same content as the input tuple, but with one specific value of the iterable field.
Parameters
| Name | Type | Description |
|---|---|---|
| field | string | The field name containing an iterable value |
Input
| Name | Type | Description |
|---|---|---|
| field | iterable | Field in the input tuple containing an iterable value |
Output
For every item of the iterable field value an output tuple is generated with the same fields as the input tuple, except for the value of field, which contains a single item from the original field iterable.
Remarks
- The output tuples are in arbitrary order.
stream:close (stub)
stream:in
Takes a stream of data, runs it through a scanner and outputs tuples.
stream:in example
    flow
    => camel:from['sftp://user@ftp.com:1234/mytextfile.txt?streamDownload=true', $type = 'java.io.InputStream']
    => stream:in[scanner = '\n', trim = 'true', charset='utf-8']
    => console
Will output the text file into the console, line by line
Description
Takes a stream of data and processes the stream into tuples.
Parameters
| Name | Type | Description |
|---|---|---|
| scanner | string or codeblock | When the argument is a string, this will use the built-in scanner to split the incoming data on the character sequence given (e.g. '\n', will split on a new line). When the argument is a code block, it expects to call a scanner function with argument body, which returns a parsed String or null. |
| trim | string | When using the built-in scanner, trim the whitespace the scanner's output. This is either 'true' or 'false'. |
| charset | string | The charset with which to parse the string. The standard charset is 'utf-16'. |
Output
A stream of tuples
template (stub)
time
Time example
concept Example {
    match '*'

    flow
        => time[
            dateStamp = 'origin:yyyy-MM-dd',
            timeStamp = 'modified:HH:mm:00'
        ]
        => console
}
Add date and time information to the data tuple.
Description
When a tuple reaches a flow element there are three timestamps that might be of interest: the original creation time of a tuple, the last modified time of a tuple, and a timestamp for the entire set. These three times are referred to as ‘origin’, ‘modified’, and ‘packet’ time respectively. With the time flow element it is possible to add fields to the tuple with values based on this time information.
Parameters
| Name | Type | Description |
|---|---|---|
| fields | list of fields | The field specifications for the output tuple |
Every field has the format fieldname = 'type:format', where
- fieldname is the name of the field added to the tuple
- type specifies which tuple timestamp is used (‘origin’, ‘modified’, or ‘packet’)
- format specifies how the type timestamp is formatted
Output
The input tuple plus the list of fields with corresponding time values as specified as defined by the flow element parameters.
Output:
{dateStamp=2015-04-02, timeStamp=15:17:00}
Remarks
The special ?filename property can also be set with the time flow element. This property is used by file-based flow elements to set a time based file name.
window:aggregate (stub)
ws (stub)
Connect directly to a websocket from a dimml server.
websocket example
flow
  => ws[]
does something
Description
This flow element lets you connect directly to a browser, by using websockets.
Parameters
| Name | Type | Description |
|---|---|---|
| field | string | JSON object string identifier, references a field available in the input tuple. |
Input
(stub)
Output
(stub)
File Access
hdfs
Example
flow
    => hdfs['hdfs://hadoop.company.org/data/demo']
Send data to HDFS (Hadoop). Authentication should be on the network level, i.e. on-premise installation, or using firewall rules. Default port is 8020.
Parameters
| Name | Type | Description |
|---|---|---|
| [first] | string | HDFS URL identifying host and path |
| header | string | (optional) header data for a file |
| footer | string | (optional) footer data for a file |
Input
| Name | Type | Description |
|---|---|---|
| ?filename | string | Filename on the server |
If the input tuple contains the ?filename property, its value will be used as the filename to store the data. This property can be set using other elements, like time or log. When no filename is specified, the default filename output.log will be used.
The tuple itself should contain only one field. The string representation of the value of this field is used as content, separated by newline characters (\n). For debugging purposes tuples that contain more than one field are also allowed. The content will then be an internal string representation of the tuple following java.util.AbstractMap#toString.
load (stub)
store
Store example
flow
  => compact
  => store[
    uri = 'ftp://user2:...@46.51.177.161/david',
    window = '1m',
    separator = ',\n ',
    header = '[\n ',
    footer = '\n]',
    data = `JsonOutput.toJson(compacted)`@groovy
  ]
//In this example the 'compact' flow is used to make the tuple available as a map.
//The store flow is configured to create a JSON array containing all tuples as JSON objects.
The above syntax uses a static storage key. The URI and other parameters do not change during the lifetime of the flow. Alternatively, you can employ a dynamic storage key. When the first parameter to the store flow is an unnamed code block, it is interpreted to be a map / javascript object that contains all the parameters required to store the data.The example below would store the data from different sections of a website in different files (assuming ‘url’ contains the current URL and the first path element identifies a section). You could also use this mechanism to create files per user session / visitor ID.
Make the data availablein in a file using an intermediate file storing server
Description
The store flow element is a more robust implementation of the FTP flow element. The store flow element stores data in a file on a FTP or SFTP server. The biggest difference is that the store flow element stores the file in an intermediate server. This allows for better robustness since the file is resend several times if the connection is unavailable. Additionally, the file is transferred from 1 location/server at the end of the time interval. This requires a lot less (parallel) connections. The only disadvantage is that data is stored in a AWS S3 environment while the FTP element streams the data directly to the end point
Parameters
| Name | Type | Description |
|---|---|---|
| uri | string | target location (See below for more information) |
| file | string | The file pattern is a name for files in the target location, where ‘%s’ is replaced with a timestamp in the format ‘yyyyMMddHHmmss’. So %s.log in the example will result in files like 20160628132700.log. The default = ‘%s.log’. |
| window | string | The ‘window’ parameter specifies the logging window to use. The smallest possible window is 30s (30 seconds). The new store flow can reliably store any window size. The commit to the external system won’t start until the complete file is finished. The default is 5 minutes. |
| seperator | string | optional, the ‘separator’ parameter is used as a separator between data elements when the file is written to the external location. |
| header | string | optional, the ‘header’ parameter is used to add a fixed line of text at the top of each file |
| footer | string | optional, the ‘footer’ parameter is used to add a fixed line of text at the top of each file |
| data | codeblock | optional, the ‘data’ parameter specifies a code block that is evaluated every time data arrives at the store flow. Instead of relying on another flow (like ‘csv’) to specify the format of what is stored, the data flow can be used to export to any format desired. |
The URI parameter
The uri parameter identifies the target location. These take the form:
scheme://username:password@host:port/path/to/storage?param1=value1¶m2=value2
The currently supported schemes are ftp and sftp. They both support encrypted credentials by supplying the credentials as a parameter (called credentials). Depending on the contents of the credentials you can omit one or more of the following: username, password, host. The ftp scheme supports tunneling FTP over SSL (called FTPS). To activate add secure to the list of parameters. Certificate validation can optionally be disabled by specifying no-validate:
ftp://user2:...@46.51.177.161/david?secure&no-validate
The sftp scheme supports private key authentication. To use it, enter the URI encoded private key as a parameter named key.
All scheme support storing the data in a zip file. To use it, add zip as a query parameter.
Output
At the specified time interval, the file with all data is provided on the location.
Databases
mongo
Example mongo flow
concept Example {
    val metric1 = `1`@groovy
    flow
    =>mongo[
        uri = 'mongodb://user:password@ds054118.mongolab.com:54118/data',
        db = 'data',
        collection = 'web'
        key = 'href, test',
        set = `[
            test: "bar",
            metric1: metric1 + 5
        ]`@groovy,
        inc = `[
            counter1: metric1,
            counter2: (2 + 3) / metric1
        ]`@groovy
    ]
}
Export the data to a Mongo DB.
The mongo element allows usage of a MongoDB document store using the provided query and database connection settings. Documents can be inserted or modified based on flow tuple fields.
Parameters
| Name | Type | Description |
|---|---|---|
| uri | string | MongoDB connection string |
| db | string | Database name |
| collection | string | optional, collection name |
| key | string | optional, list of fields |
| set | string | optional, hash describing key-value pairs of the document |
| inc | string | optional, hash describing increment keys and values |
For the uri parameter you can use the format as described in the mongo documentation: https://docs.mongodb.com/manual/reference/connection-string/.
The key parameter is a comma-separated list of vals used as the filter query for document updates. If if provided an upsert query is executed instead of an insert query. The documetns in MongoDB to be updated are the ones that match the conjunction of value equality checks for all listed keys in the key parameter, where the MongoDB document values are compared to the data tuple vals. If no documents match the filter query, a single document is inserted.
The set parameter is a code block returning a map of MongoDB fields and according values to be set. When omitted all vals in the data tuple will be sent to MongoDB. Vals in the set parameter that are also present in the inc parameter are excluded.
The inc parameter is a map returning code block specifying the MongoDB fields and according increment values. The counter field is either updated according to the increment value, or added as a field to the matching documents with the increment value as value.
If no set parameter is provided, the document consists of all fields in the data tuple. If no key parameter is provided, the inc parameter will not be used. Keys used in the inc parameter are excluded from the keys in the set parameter to avoid ambiguity.
sql (improve)
SQL example
concept Example {
    match '*'

    const dataSource = `{
        type: 'mysql',
        port: 3306,
        serverName: 'localhost',
        databaseName: 'test',
        user: 'test',
        password: 'test'
    }`

    val a = 'a'

    flow
        => sql["INSERT INTO `test` (`a`) VALUES (:a)", `dataSource`]
        => console
}
Output:
{a=a, sqlCount=1}
Interact with an SQL database.
Description
The sql element allows usage of a relational database using the provided query and database connection settings. The query can be parameterized by referring to flow tuple fields using the colon notation.
Parameters
Vertica
const db = `{
    type: 'vertica',
    host: 'vertica.dimml.io',
    database: 'dimml',
    userID: 'dbadmin',
    password: 'test123'
}`
Snowflake
const db = `{
    type: 'snowflake',
    credentials: 'P+fbjkAK2f2GBbQ04tcsfA8APJ/O9W5xn5GnCxocMrGFGW8y0BhntYxjzOR...',
    serverName: 'to34711.eu-west-1.snowflakecomputing.com',
    databaseName: 'DIMML',
    schema: 'DIMML_DEMO'
}`
| Name | Type | Description |
|---|---|---|
| statement | string | Database query |
| configuration | json | Database configuration |
| cache | string | (optional) Specify caching parameters |
| limit | integer | (optional) Maximum numer of results for a selection query |
| fieldName | string | (optional) Field name for storing selection query results |
| batch | boolean | (optional) Batch process |
The statement is the SQL query, which using colon notation can be parameterized by including the values from the data tuple. So field field from the data tuple is available as :field in the SQL query statement.
The configuration parameter is an expression resulting in a Javascript object / Java map that contains the configuration for connecting to a datasource. The following fields are used commonly in the datasource configuration:
type- Mandatory field to indicate the type of database to connect to. Current options are ‘mysql’, ‘postgresql’ or ‘oracle’. serverName- The host name to use in connecting to the target database. port- The port to use in connecting to the target database. databaseName- The name of the database on the target server. user- (optional) Username when authentication is needed. password- (optional) Password when authentication is needed.
Any field available in configuring the target datasource can be specified using this configuration mechanism. The exact fields depend on the type of database.
Parameter cache applies only to selection queries. It enables caching of results returned by a selection query. When the same query is executed again, results will be returned from the cache. A cache hit is identified by comparing all tuple fields that are used to parameterize the query. The syntax of this parameter is [size]:[time]. The size determines the maximum size of the cache. When there is no more room in the cache the least recently used item is evicted. The time parameter specifies a maximum time for items to remain in the cache. The prefix can range from ms for milliseconds to h for hour. The default is 1m.
Parameter limit applies only to selection queries. It specifies the maximum amount of records to retrieve. By default this limit is set to 1, which is a special mode of operation in that it will add retrieved fields to the current tuple. When a higher limit is set, the data will be stored as a list of maps, where each map contains the data of one row. By default this list is stored in the field named result. This can be overwritten using the fieldName parameter.
Parameter fieldName applies only to selection queries. It overwrites the field name used to store the result of a multi-record selection query as described in the limit parameter explanation.
The batch parameter gives control over how queries are batched. By default all calls to the external datasource are batched. This will improve throughput at the cost of latency. By waiting a small amount of time the sql flow will ensure that most calls to the database benefit from this mechanism. The batch size can be specified using this parameter; the default value is 50.
Sending insert or update queries in batches is usually the best thing to do. In selection queries this might be problematic, especially when the query is part of a flow that produces synchronous output. Furthermore, data that passed through a batched selection query will be bundled together and treated as one set. It will have lost access to the original context that produced the data. When using a selection query in a synchronous flow always set batch to1, which effectively disables batching for that query. Tuples passing through the sql flow will retain their original context, allowing the flow to be used in combination with synchronous flows as used by the output plugin.
Output
For insert and update queries:
sqlCount(integer) – The number of affected rows
For selection queries with one result row:
List of selected columns- Each selected column is transformed to a key-value pair that is added to the output tuple.
For selection queries with multiple result rows:
fieldName- List of maps, where each map contains the data of one row. The field name is defined by thefieldName parameter, which is result by default.
Remarks
- The database server should be accessible using the provided connection settings.
- The database user should have the correct privileges to execute the query.
sql:direct (stub)
External Data
avro (stub)
camel (improve)
Use Apache Camel to quickly collect data from or distribute data to external sources
flow
  => camel:from['ftp://..', $type = 'java.io.InputStream']
  => code[body = `def zip=new java.util.zip.ZipInputStream(body);zip.getNextEntry();zip`]
Description
Define new fields based on client side or server side code. The flow element is split into two specific elements: camel:to and camel:from, indicating if the DimML application should get data from that source or actually send the data.
Parameters
Camel instruction (string) – Camel instruction defining what type and specific instruction to execute List of context and dependencies – Depending on the connection type additional details in native code
Details on possible camel instructions can be found at camel.apache.org/components.html. Please contact us if a specific Camel integration is required for providing the specific code. Additionally the example below illustrates several uses of the Camel flow element.
Input
No specific requirements
Output
@groovy
concept TestService {
  match `keepalive`@cron

  flow
    => camel:from[
      'ftp://user@ftp.site.com/hi/input?binary=true&password=...&move=done&passiveMode=true',
      $type = 'java.io.InputStream'
      ]
    => code[body = `def zip=new java.util.zip.ZipInputStream(body);zip.getNextEntry();zip`]
   => stream:in[scanner = '\n']
   => console
}
The Camel component is started. Note that for the Camel components which run continously, calling the Camel flow element will result in the Camel component to start executing continously as well. For example calling the Camel flow element which makes a call to an FTP server for receiving files, will result in the Camel component to run continuously. That means that after completing the initial flow, if additional files are placed on the server in 2 hours, the flow will be executed with the new data (file) starting from the camel component. Example Note that for reading file from an FTP server it is also possible to read a zip file. To do that, the file can be read as usual, but with a specific flow element to follow up. Using the code below will unzip the file
Additionally, most camel connections generate a burst of events. When opening a (log) file and transforming each row into an event, a high amount of events will be processed by the platform. While this is not a problem for the platform, not all end points where the data is distributed to can handle this. That is way it is best practice to make the data from the camel flow element available as a stream and use the stream flow element to throttle the events. Below is an example of that
http (improve)
HTTP example
concept Example {
    match '*'

    => code[apiurl = `"http://53.15.28.16:8080/restapi/getversion"`@groovy]
    => http[
        url = '@apirul',
        method = 'GET',
        headers = 'Accept: application/json\n Authorization: Basic YWRtaRtaW4='
        data = ''
       ]
    => filter['result']
    => console
}
Output (note that the URL does not exist so the code won’t work in a sandbox environment):
{result = v3.4}
Perform an asynchronous HTTP request.
Description
Use an iterable field in the input tuple, to generate multiple similar output tuples. Every output tuple has the same content as the input tuple, but with one specific value of the iterable field.
Parameters
| Name | Type | Description |
|---|---|---|
| method | string | The HTTP method to use |
| url | string | the URL to use in the HTTP requet |
| headers | string | A set of headers, separated by a newline |
| data | string | The body of the HTTP request |
All parameters can define their respective content in the definition of the http element (like method, url and headers do in the example). Alternatively, the parameters url, headers and data can optionally specify a field in the input tuple to use. The field is identified by prepending it with the at sign (@)
Input
No specific input requirements
Output
A field result is added to the data tuple which contains the result of the HTTP request
kafka (stub)
Mail example
concept Example {
    val Title = `'Email title'`@groovy
    val Body = `'Email body'`@groovy

    flow
    => code[
      to = `'support@yourdomain.com'`,
      subject = `'DimML Mail services'`,
      mime = `'text/html'`,
      text = `"""
                <html><head><title>'+Title+'</title></head>
                <body style="font-family:verdana;font-size:11px;">
                +Body+
                '</body></html>'`
    ]
    => mail[`EMAIL_OPTIONS`]

    const EMAIL_OPTIONS = `{
        username: 'userXXX',
        password: 'passwordXXXX',
        from: 'mail@dimml.io',
        auth: true,
        'starttls.enable': true,
        host: 'email-smtp.domain.com',
        port: 123
    }`
}
Send an email using the availalable data
Description
The mail element allows the application to send an email using fields that have been processed until that point.
Parameters
| Name | Type | Description |
|---|---|---|
| configuration | JSON | SMTP configuration |
The configuration parameter is an expression resulting in a Javascript object / Java map that contains the configuration for connecting to an SMTP server. The following fields are used commonly in the SMTP configuration:
| Name | Type | Description |
|---|---|---|
| username | string | SMTP server username |
| password | string | SMTP server password |
| from | string | Sender’s mail address |
On top of this, the list of properties from the com.sun.mail.smtp package
can be used to pass options. To do this, omit mail.smtp, and include the rest in the javascript object.
Examples of options from the com.sun.mail.smtp package:
| Name | Type | Description |
|---|---|---|
| host | string | SMTP server host name |
| port | integer | SMTP server port |
| auth | boolean | Indicates if SMTP server requires authentication |
| starttls.enable | boolean | Encrypted connection |
Input
| Name | Type | Description |
|---|---|---|
| to | string | Recipient’s mail address |
| subject | string | Mail subject |
| tet | string | Mail content |
| mime | string | Used for extending the format to HTML |
Output
The output tuple is equal to the input tuple.
socket
Example
@groovy
concept Test {
    match `once`@service

    flow
        => socket[`"hello, the time is: ${System.currentTimeMillis()}\n"`,
            host = 'example.org',
            port = '5000']
}
Sends raw data over a TCP socket connection. The data is periodically send to the specified host, but most of the time with a sub-second delay.
Parameters
| Name | Type | Description |
|---|---|---|
| [unnamed] | code | the code to determine the content of the data to send. When this results in a byte array or Java ByteBuffer, the data is transferred as is. Otherwise the toString method is called and the result is UTF-8 encoded. |
| host | string | the hostname of the target server |
| port | string | the target port on the specified host |
Remarks
- for testing use
nc -l 5000to listen on port 5000 in a terminal
ssh (stub)
xmlrpc (stub)
Miscellaneous
excel (stub)
excel:read (stub)
git:load (stub)
ip:classify (stub)
minify (stub)
pdf (stub)
referrer
Add the visitor's referrer to the data tuple
Parameters
none
Output
The visitor's referrer, if existent.
useragent2 (stub)
Deprecated
adwords:awql
Example usage
flow
  => adwords:awql["
    SELECT CampaignId,CampaignName
    WHERE Ctr > 0.05 AND Impressions < 100
    DURING 20170901,20170930
    ORDER BY CampaignName DESC
    LIMIT 0,50", `adwordsConfig`]
  => console

const adwordsConfig = '
  api.adwords.refreshToken=1/8StJAU...
  api.adwords.clientId=1237318626.apps.googleusercontent.com
  api.adwords.clientSecret=R7PVGd...
  api.adwords.clientCustomerId=118-...
  api.adwords.userAgent=DimML
  api.adwords.developerToken=hqsM4r...

  api.adwords.isPartialFailure=false
  api.adwords.returnMoneyInMicros=true
  api.adwords.reportDownloadTimeout=180000
  api.adwords.refreshOAuth2Token=true
'
The collection of adwords: flow elements provide access to Google Adwords data using the Google AdWords API v201406.
All of the elements expect the last parameter to be a code block returning a string that contains the properties required to connect to the Google AdWords API. The format of this string is identical to that of ads.properties.
Description
Run a parameterized AWQL query in Google AdWords and make the result available as a local file or list of tuples.
    => adwords:awql['
         SELECT CampaignId, CampaignName
         FROM CAMPAIGN_PERFORMANCE_REPORT
         WHERE CampaignName IN [:campaigns]
         DURING YESTERDAY
       ', `adwordsConfig`]
Parameters
| Name | Type | Description |
|---|---|---|
| query | string | Parameterized AWQL query. Parameters are denoted using a colon (:). In the example the value of the 'campaigns' field in the input tuple will replace the ':campaigns' placeholder in the query. |
Output
adwords:awql will output the result of the query as a list of tuples. Optionally the file parameter can be set to 'true' (as in the example). In this mode the result will remain in the file system and the output tuple contains a 'file' field that contains a java.io.File object of the result.
anomaly (stub)
azure:blob
Example
flow
    => azure:blob[
        name = "myStorageAccount",
        storageKey = "...",
        uri = "//container/path/to",
        flush = "true"
    ]
Outputs to a BLOB file stored in a Microsoft Azure container.
Description
Store flow data in an Azure cloud storage account according to the specified settings. By default the data is appended to existing file; data is streamed real time.
Parameters
| Name | Type | Description |
|---|---|---|
| name | string | Azure account name |
| storageKey | string | Azure storage key |
| uri | string | Azure container and prefix (path) in URI form, e.g. //o2mc |
| header | string | (optional) header data for a file |
| footer | string | (optional) footer data for a file |
| flush | string | (optional) "true" or "false" to enable or disable flush mode. If flush mode is enabled, the element sends data to Azure even when data is still being received for a particular file. |
Input
| Name | Type | Description |
|---|---|---|
| ?filename | string | Filename on the server |
If the input tuple contains the ?filename property, its value will be used as the filename to store the data. This property can be set using other elements, like time or log. When no filename is specified, the default filename output.log will be used.
The tuple itself should contain only one field. The string representation of the value of this field is used as content, separated by newline characters (\n). For debugging purposes tuples that contain more than one field are also allowed. The content will then be an internal string representation of the tuple following java.util.AbstractMap#toString.
Output
No output tuple is generated by this element.
ftp
FTP example
concept Example {
    match '*'
    val a = 'a'

    flow
        => time[?filename = "origin:yyyyMMdd'.log'"]
        => csv
        => ftp[
            host = 'example.com',
            user = 'user',
            password = 'password',
            dir = 'directory',
            flush = 'true'
        ]
}
Connect to the example.com FTP server, with username user and password password, to append a CSV format of the input tuple to the file myfile[yyyyMMdd].log (with yyyyMMdd being the current date) in the directory directory. In this case the file would contains the value ‘a’ (which is the CSV format of the entire input tuple.
Export the data to a file on an FTP server.
Description
Store flow data on a remote FTP server according to the specified FTP server settings. By default the data is appended to existing file; data is streamed real time.
Parameters
| Name | Type | Description |
|---|---|---|
| host | string | FTP server hostname |
| user | string | FTP server username |
| password | string | FTP srever password |
| dir | string | FTP server directory |
| header | string | (optional) header data for a file |
| footer | string | (optional) footer data for a file |
Input
| Name | Type | Description |
|---|---|---|
| ?filename | string | Filename on the server |
If the input tuple contains the ?filename property, its value will be used as the filename to store the data. This property can be set using other elements, like time or log.
When no filename is specified, the default filename output.log will be used.
Output
No output tuple is generated by this element.
Remarks
- The FTP server should allow FTP connections from the DimML server.
- The FTP server should be in passive mode.
- The FTP server should allow append uploads.
graphrec (stub)
iota (stub)
log (stub)
Adds the current date to the tuple.
moa:classify
Example
const MODEL = `{
    $name: "david.testmoa",
    sepal_length: 0,
    sepal_width: 0,
    petal_length: 0,
    petal_width: 0,
    species: ['setosa', 'versicolor', 'virginica']
}`
const MODEL_CSV = 'https://gist.githubusercontent.com/curran/a08a1080b88344b0c8a7/raw/d546eaee765268bf2f487608c537c05e22e4b221/iris.csv'

@groovy
concept TestMOA {
    match `once`@service

    flow
        => http[`[url: MODEL_CSV, streamDownload: true, output: 'body']`]
        => stream:in[scanner = '\n', charset = 'utf-8', trim = 'true', sendDone = 'true'] (done)
        => select[`body ==~ /\d.*/`] (train)

    flow (train)
        => code[body = `
            def split = body.split(',')
            [
                sepal_length: split[0] as double,
                sepal_width: split[1] as double,
                petal_length: split[2] as double,
                petal_width: split[3] as double,
                species: split[4]
            ]`]
        => expand['body']
        => moa:naivebayes[model = `MODEL`, class = 'species']

    flow (done)
        => code[i = `(0..9).toList()`] => split['i']
        => code[body = `MODEL
            .findAll {it.value instanceof Number}
            .each {it.setValue(Math.random()*6)}`]
        => filter['body'] => expand['body'] => filter['-body']
        => moa:classify[model = `MODEL`]
        => console
}
The example defines the model as a
MODELconstant. The data is taken from the well-known Iris dataset, which can be downloaded in CSV format from the specifiedMODEL_CSVurl.The
TestMOAconcept is a run once service concept: it executes when published. The content of the URL is loaded as a stream and split using a simple newline scanner. Training data is send to thetrainflow and when training is done, some random data is generated in thedoneflow.The train flow parses the CSV and adds the appropriate fields resulting in labeled data (i.e. the class field 'species' is set). When calling
moa:naivebayeswe specify 'species' as the class field.When stream processing is finished, some random input is generated.
moa:classifywill label the data according to the model and the result is printed to the console.
Uses a trained MOA model to classify unlabeled input. Its counterpart, moa:naivebayes, can be used to train a Naive Bayes Multinomial classifier.
The model is described in a constant as an object with simple numeric or nominal values. To indicate a numeric attribute, use a number (usually 0). To indicate a nominal, list the values in an array as strings (see example on the right). Models should be uniquely named by including a $name attribute. moa:classify and moa:naivebayes are linked accross all domains and partners when their definition is the same. This includes the name.
Parameters
| Name | Type | Description |
|---|---|---|
| model | code | code that results in the model object. The code does not have access to the incoming tuple. |
Input
The input should be unlabeled data, i.e. every attribute in the model except the class attribute. Make sure to match the types as defined in the model: numeric attributes should have a numeric value and nominal attributes should have a string value.
Another mode of operation can be chosen by specifying a value for the class attribute (see example to the right).
        => filter['body'] => expand['body'] => filter['-body']
        => code[species = 'setosa']
        => moa:classify[model = `MODEL`]
        => console
This mode will return the chance that given the unlabeled input, 'satosa' will be the outcome.
Output
Classification will use the model the most likely 'class' that the unlabeled data belongs to. There will be an entry for the class attribute in the model specifying the most likely candidate in the list.
When the class attribute was specified in the input, the output will instead be a double precision number between 0 and 1 indicating the chance the data indeed belongs to the specified class.
moa:naivebayes
Trains a Naive Bayes Multinomial classifier using Massive Online Analysis (MOA). Its counterpart, moa:classify, uses the trained model to classify unlabeled input.
In MOA the model is not fixed. Training and using the model can run in parallel. This makes it ideally suited for use with streaming data.
Parameters
| Name | Type | Description |
|---|---|---|
| model | code | code that results in the model object. The code does not have access to the incoming tuple. |
| class | string | name of the attribute in the model that should be classified |
Input
The input should be labeled data, i.e. every attribute in the model, including the class attribute. Make sure to match the types as defined in the model: numeric attributes should have a numeric value and nominal attributes should have a string value.
nlp:emotion
Divides a sentence or piece of text into tokens (“words”).
nlp:emotion example
flow
  => nlp:tokenize
The text is output as ["token1", "token2", "token3"]
nlp:language
Determines the language of the sentence or piece of text at hand
nlp:language example
// {text: 'This is a happy message!'}
flow
  => nlp:language
This code element takes any (tokenized) human-written message and provides an additional language field. The language is composed of a ISO 639-1 language code followed by an underscore and a ISO 3166 Country Code (examples: en\_UK, de\_DE, nl\_NL)
nlp:polarity
Determines the polarity of a piece of text (either ‘negative’, ‘neutral’ or ‘positive’)
nlp:polarity example
flow
  => nlp:polarity
A polarity label (positive, negative or neutral) and a score (in the interval -1 to 1]) is added to the fields based on the tokenization
nlp:tag
Grammatically disassembles tokens of a message.
nlp:tag example
flow
  => nlp:tag
Determines the word categories of the words in the sentence by means of Part-Of-Speech (POS) tagging. The output is a list with a same amount of elements as the tokens where each element specifies the type of word of that token. For example ["DT", "NN", "VB"]
nlp:tokenize
Divides a sentence or piece of text into tokens (“words”).
nlp:tokenize example
flow
  => nlp:tokenize
The text output will look like this: ["token1", "token2″, "token3"]
pmml
Pmml example
concept Global {
    match '*'

    val cijfer = `(new dimml.uri(location.href)).query('cijfer') || -1`

    flow (pmml)
        => select[`cijfer >= 0`]
        => pmml[`pmml`]
        => out

    output[flowName = 'pmml'] `
        console.log('Ik vind je cijfer '+leuk);
    `

    const pmml = '
        <PMML version="4.1" xmlns="http://www.dmg.org/PMML-4_1">
          <Header copyright="O2mc">
            <Application name="KNIME" version="2.10.0"/>
          </Header>
          <DataDictionary numberOfFields="3">
            <DataField name="name" optype="categorical" dataType="string">
              <Value value="data"/>
              <Value value="it"/>
              <Value value="taal"/>
              <Value value="programmeren"/>
              <Value value="afwas"/>
            </DataField>
            <DataField name="cijfer" optype="continuous" dataType="double">
              <Interval closure="closedClosed" leftMargin="4.0" rightMargin="8.0"/>
            </DataField>
            <DataField name="leuk" optype="categorical" dataType="string">
              <Value value="leuk"/>
              <Value value="niet leuk"/>
            </DataField>
          </DataDictionary>
          <TreeModel modelName="DecisionTree" functionName="classification" splitCharacteristic="binarySplit" missingValueStrategy="lastPrediction" noTrueChildStrategy="returnNullPrediction">
            <MiningSchema>
              <MiningField name="name" invalidValueTreatment="asIs"/>
              <MiningField name="cijfer" invalidValueTreatment="asIs"/>
              <MiningField name="leuk" invalidValueTreatment="asIs" usageType="predicted"/>
            </MiningSchema>
            <Node id="0" score="leuk" recordCount="5.0">
              <True/>
              <ScoreDistribution value="leuk" recordCount="3.0"/>
              <ScoreDistribution value="niet leuk" recordCount="2.0"/>
              <Node id="1" score="niet leuk" recordCount="2.0">
                <SimplePredicate field="cijfer" operator="lessOrEqual" value="6.0"/>
                <ScoreDistribution value="leuk" recordCount="0.0"/>
                <ScoreDistribution value="niet leuk" recordCount="2.0"/>
              </Node>
              <Node id="2" score="leuk" recordCount="3.0">
                <SimplePredicate field="cijfer" operator="greaterThan" value="6.0"/>
                <ScoreDistribution value="leuk" recordCount="3.0"/>
                <ScoreDistribution value="niet leuk" recordCount="0.0"/>
              </Node>
            </Node>
          </TreeModel>
        </PMML>
    '
}
PMML can be used to build predictive models. The 'pmml' flow allows the execution of these models in DimML (see example to the right). PMML models can be built using tools like KNIME, RapidMiner, SAS, etc.
PMML models up to version 4.1 are supported. The model's input attributes should be named identical to those in the input tuple. Similarly the output field will be named as described in the PMML model.
The model itself is encoded as XML in a DimML constant:
Parameters
| Name | Type | Description |
|---|---|---|
| model | const | The PMML model as an XML string in a dimml constant |
s3
Example
flow
    => s3[
        id = "myStorageAccount",
        secret = "...",
        url = "//container/path/to"
    ]
Outputs to a file in an S3 bucket.
Parameters
| Name | Type | Description |
|---|---|---|
| id | string | The amazon user id |
| secret | string | The amazon S3 secret |
| url | string | String containing the URI of the bucket in which to store the file |
| disableGuid | string | Disable adding a new GUID to the end of the path |
| ?filename | string | optional, Defaults to output.log |
sftp
Export the data to a file on an FTP server.
Description
The sftp element is similar to the ftp element, the only difference being that it connects to an secure server. Therefor the syntax and use is the same as the ftp element.
sql:update (stub)
Twitter example
concept Example {
        match `keepalive`@cron

        flow
            => twitter[`TWITTER_OPTIONS`]
            => debug

        const TWITTER_OPTIONS = `{
            consumerKey: '...',
            consumerSecret: '...',
            token: '...',
            secret: '...',
            terms: ['#beer']
            lang: ['nl','en']
        }`
    }
Output: Data tuples containing JSON formatted
messagevalues, for every message placed on Twitter that matches the specified terms and languages.
Retrieve data from the Twitter streaming API
Description
The twitter producer flow emits data whenever it is available in Twitter. It should be used in combination with a keepalive service, to keep the flow active and ensure that the twitter flow element keeps emitting data tuples.
Parameters
configuration – JSON field containing the twitter configuration details
The configuration parameter is an expression resulting in a Javascript object / Java map that contains the configuration for connecting to the Twitter streaming data API. The following fields are used commonly in the Twitter configuration:
consumerKey (string) – Twitter consumer key consumerSecret (string) – Twitter consumer secret token (string) – Twitter token secret (string) – Twitter secret terms (Array[string]) – List of terms to monitor in the streaming API lang (Array[string]) – Language filter
Output
message – JSON formatted tweet data returned form the Twitter streaming API
Remarks
The twitter flow element keeps emitting data tuples for each new tweet retrieved from the Twitter API. Normally the flow would be deactived by the system after a certain period of time. To prevent this the keepalive mechanism from the example can be used to keep the flow active.
useragent
Useragent example
@groovy
concept Test {
  match '*'

  request[ua = `headers['User-Agent']`]

  flow
    => useragent[parsed = 'ua']
    => console
}
Output: {parsed={name=Chrome, device=PERSONAL_COMPUTER, family=CHROME, os=WINDOWS, osVersion=10.0, type=BROWSER, version=54.0.2840.99}, ua=Mozilla/5.0 (Windows NT 10.0; Win64; x64) AppleWebKit/537.36 (KHTML, like Gecko) Chrome/54.0.2840.99 Safari/537.36}
Make user agent data available server side
Description
The user agent flow element will process the user agent headers into a list of properties by processing the value for the header server side. Note that the request header can be used to capture the user agent string. Additionally for web pages the Javascript function navigator.userAgent can be used to capture the user agent string as well.
Parameters
| Name | Type | Description |
|---|---|---|
| input | string | name of the field that contains the user agent string |
| output | string | name of the field that contains the properties as an object. The properties are name, device, family, os, osVersion, type, version |
Output
The following fields are added to the output tuple:
| Name | Type | Description |
|---|---|---|
| family | string | Browser family |
| name | string | Browser name |
| type | string | Browser type |
| version | string | Browser version |
| os | string | Operating System name |
| osVersion | string | Operating System version |
| device | string | Device type |
Details
The user agent flow element takes a field that contains the value for the user agent and calculates several properties based on the value. The Udger (https://udger.com/) library is used for this. The source code is available at the website. Additionally this zip files contains a XML description of all rules that are applied for computing the different properties:
- family – Browser family
- name – Browser name
- type – Browser type
- version – Browser version
- os – Operating System name
- osVersion – Operating System version
- device – Device type
Below are the possbile values for some of the high level properties
Device type
- Personal computer
- Smartphone
- Tablet
- Game console
- Smart TV
- PDA
- Wearable computer
- Other
Browser family
- 2Bone LinkChecker
- 3DS Browser
- A1 Sitemap Generator
- A1 Website Analyzer
- A1 Website Download
- AB (Apache Bench)
- Abilon
- Abolimba
- ABrowse
- Acoo Browser
- ActiveXperts Network Monitor
- Adobe AIR runtime
- AirMail
- Akregator
- Alienforce
- Amaya
- Amiga Aweb
- Amiga Voyager
- Amigo
- Android browser
- Android HttpURLConnection
- Anemone
- Anonymouse.org
- ANT Fresco
- anw HTMLChecker
- anw LoadControl
- AOL Explorer
- Apache internal dummy connection
- Apache Synapse
- Apache-HttpAsyncClient
- Apache-HttpClient
- Apple Mail
- Apple-PubSub
- Arora
- Atomic Email Hunter
- Atomic Web Browser
- Avant Browser
- AvantGo
- Aviator
- Awasu
- Axel
- Baidu Browser
- Baidu mobile browser
- Baidu Spark
- Banshee
- Barca
- Beamrise
- Beonex
- BinGet
- BlackBerry Browser
- Blackbird
- BlackHawk
- Blazer
- BlogBridge
- Bloglines
- BlueCrab
- Bolt
- Bookdog
- BookmarkTracker
- Boxxe
- BrownRecluse
- BrowserEmulator
- BrowseX
- Browzar
- Bunjalloo
- Camino
- CFNetwork
- Charon
- Checkbot
- Cheshire
- Chilkat HTTP .NET
- Chrome
- Chrome Mobile
- Chromium
- Claws Mail GtkHtml2 plugin
- Coast
- Columbus
- CometBird
- Comodo Dragon
- Conkeror
- CoolNovo
- CorePlayer
- CoRom
- CPG Dragonfly RSS Module
- Crazy Browser
- CSE HTML Validator
- cURL
- Cyberduck
- Cynthia
- Cyotek WebCopy
- Deepnet Explorer
- Dell Web Monitor
- Demeter
- DeskBrowse
- Dillo
- DocZilla
- Dolphin
- Dooble
- Doris
- DownloadStudio
- DPlus
- Edbrowse
- Element Browser
- Elinks
- Enigma browser
- Epic
- Epiphany
- Espial TV Browser
- Eudora
- EventMachine
- Evolution/Camel.Stream
- Fastladder FeedFetcher
- Feed Viewer
- Feed::Find
- FeedBurner
- FeedDemon
- Feedfetcher-Google
- FeedParser
- FeedValidator
- Firebird (old name for Firefox)
- Firefox
- Firefox (BonEcho)
- Firefox (GranParadiso)
- Firefox (Lorentz)
- Firefox (Minefield)
- Firefox (Namoroka)
- Firefox (Shiretoko)
- Fireweb Navigator
- Flock
- Fluid
- FlyCast
- foobar2000
- Funambol Mozilla Sync Client
- Funambol Outlook Sync Client
- Galeon
- GcMail
- GetRight
- GlobalMojo
- Gmail image proxy
- GnomeVFS
- GO Browser
- Go http package
- GoldenPod
- GOM Player
- Google App Engine
- Google Docs viewer
- Google Earth
- Google Friend Connect
- Google Listen
- Google Rich Snippets Testing Tool
- Google Wireless Transcoder
- gPodder
- GreatNews
- GreenBrowser
- Gregarius
- GSiteCrawler
- GStreamer
- Guzzle
- Holmes
- HotJava
- HTML2JPG
- HTMLayout
- HTMLParser
- HTTP nagios plugin
- HTTP_Request2
- HTTrack
- Hv3
- Hydra Browser
- IBM WebExplorer
- IBrowse
- iCab
- iCatcher!
- ICE browser
- IceApe
- IceCat
- IceDragon
- IceWeasel
- IE
- IE Mobile
- IE RSS reader
- iGetter
- iGooMap
- Indy Library
- InoReader
- InternetSurfboard
- iRider
- Iron
- iSiloX
- iSiloXC
- iTunes
- iVideo
- IXR lib
- Jakarta Commons-HttpClient
- Jamcast
- Jasmine
- Java
- JoBo
- JS-Kit/Echo
- K-Meleon
- K-Ninja
- Kapiko
- Kazehakase
- Kindle Browser
- Kinza
- Kirix Strata
- KKman
- Klondike
- Konqueror
- Kylo
- LBrowser
- LeechCraft
- LFTP
- LG Web Browser
- LibSoup
- libwww-perl
- Liferea
- LinkbackPlugin for Laconica
- LinkChecker
- LinkExaminer
- Links
- LinkWalker
- Lobo
- lolifox
- Lotus Notes
- luakit
- Lunascape
- LWP::Simple
- Lynx
- Madfox
- MagpieRSS
- Manticore
- Maple browser
- Maxthon
- Maxthon mobile
- Mechanize
- MicroB
- Microsoft Office Existence Discovery
- Microsoft WebDAV client
- Midori
- Mini Browser
- Minimo
- Miro
- Mobile Firefox
- Mobile Safari
- Motorola Internet Browser
- Mozilla
- MPlayer
- MPlayer2
- muCommander
- Multi-Browser XP
- Multipage Validator
- MultiZilla
- MxNitro
- My Internet Browser
- NCSA Mosaic
- NetBox
- NetCaptor
- NetFront
- NetFront Life
- NetFront Mobile Content Viewer
- NetNewsWire
- NetPositive
- Netscape Navigator
- NetSurf
- Netvibes feed reader
- Newsbeuter
- NewsBreak
- NewsFox
- NewsGatorOnline
- NFReader
- NineSky
- Nintendo Browser
- Nokia SyncML Client
- Nokia Web Browser
- Novell BorderManager
- Obigo
- Off By One
- Offline Explorer
- Omea Reader
- OmniWeb
- ONE Browser
- Openwave Mobile Browser
- Opera
- Opera Mini
- Opera Mobile
- Orca
- Oregano
- Otter
- Outlook 2007
- Outlook 2010
- Outlook 2013
- OWB
- P3P Validator
- Pale Moon
- Palm Pre web browser
- Palm WebPro
- Paparazzi!
- Patriott
- Pattern
- PEAR HTTP_Request
- Perk
- PhantomJS
- Phaseout
- Phoenix (old name for Firefox)
- PHP
- PHP link checker
- PHP OpenID library
- PHPcrawl
- Plex Media Center
- Pocket Tunes
- PocoMail
- Podkicker
- POE-Component-Client-HTTP
- Polaris
- Polarity
- Postbox
- Powermarks
- Prism
- PRTG Network Monitor
- PS Vita browser
- PS4 Web browser
- Public Radio Player
- Puffin
- PycURL
- Python-requests
- Python-urllib
- Python-webchecker
- QQbrowser
- QtWeb
- QuickTime
- QupZilla
- Radio Downloader
- Rambler browser
- Reeder
- Rekonq
- REL Link Checker Lite
- RestSharp
- retawq
- Roccat browser
- RockMelt
- ROME library
- Rss Bandit
- RSS Menu
- RSS Popper
- RSS Radio
- RSSOwl
- Ruby eat
- Ryouko
- SaaYaa Explorer
- Safari
- Safari RSS reader
- Sage
- Screaming Frog SEO Spider
- SeaMonkey
- SEMC Browser
- Seznam RSS reader
- Seznam WAP Proxy
- SharpReader
- Shiira
- Shredder
- Siege
- Silk
- SimplePie
- SiteKiosk
- SiteSucker
- SkipStone
- Skyfire
- Sleipnir
- SlimBoat
- SlimBrowser
- SmartBrowserPlugin for TC
- Snoopy
- Sogou Explorer
- Songbird
- Sparrow
- Spicebird
- Stainless
- SubStream
- Summer
- Sundance
- Sundial
- Sunrise
- Superbird
- SuperBot
- Surf
- Swiftfox
- Swiftweasel
- Tear
- TeaShark
- Teleport Pro
- TenFourFox
- Tesla Car Browser
- The Bat!
- TheWorld Browser
- Thunderbird
- Tizen Browser
- Tjusig
- Trileet NewsRoom
- TT Explorer
- Tulip Chain
- Typhoeus
- Ubuntu web browser
- UC Browser
- UltraBrowser
- urlgrabber
- Usejump
- uZard Web
- Uzbl
- Validator.nu
- VLC media player
- Vonkeror
- Vuze
- W3C Checklink
- W3C CSS Validator
- W3C mobileOK Checker
- W3C Validator
- w3m
- WapTiger
- Waterfox
- WDG CSSCheck
- WDG Page Valet
- WDG Validator
- Web Explorer
- Web-sniffer
- WebCollage
- WebCopier
- webfetch
- webfs
- Webian Shell
- WebRender
- WebStripper
- WebZIP
- Weltweitimnetz Browser
- Wget
- WhatWeb
- Winamp for Android
- Windows Live Mail
- Windows Media Player
- WinHTTP
- WinPodder
- WinWap
- wKiosk
- WordPress pingback
- WorldWideWeb
- wOSBrowser
- WWW::Mechanize
- Wyzo
- X-Smiles
- Xaldon WebSpider
- XBMC
- Xenu
- xine
- XML-RPC for PHP
- XML-RPC for Ruby
- XMPlay
- Yahoo Link Preview
- YahooFeedSeeker
- Yandex.Browser
- Yandex.Browser mobile
- YeahReader
- YOURLS
- YRC Weblink
- zBrowser
- Zend_Http_Client
- ZipZap
Operating system name
- AIX
- Amiga OS
- Android
- Android 1.0
- Android 1.5 Cupcake
- Android 1.6 Donut
- Android 2.0/1 Eclair
- Android 2.2.x Froyo
- Android 2.3.x Gingerbread
- Android 3.x Honeycomb
- Android 4.0.x Ice Cream Sandwich
- Android 4.1.x Jelly Bean
- Android 4.2 Jelly Bean
- Android 4.3 Jelly Bean
- Android 4.4 KitKat
- AROS
- Bada
- BeOS
- BlackBerry OS
- BlackBerry Tablet OS 1
- BlackBerry Tablet OS 2
- Brew
- Chrome OS
- Danger Hiptop
- DragonFly BSD
- Firefox OS
- FreeBSD
- GNU OS
- Haiku OS
- HP-UX
- Inferno OS
- iOS
- iOS 3
- iOS 4
- iOS 5
- iOS 6
- iOS 7
- iOS 8
- IRIX
- Joli OS
- JVM (Java)
- JVM (Platform Micro Edition)
- Linux
- Linux (Arch Linux)
- Linux (CentOS)
- Linux (Debian)
- Linux (Fedora)
- Linux (Gentoo)
- Linux (Kanotix)
- Linux (Knoppix)
- Linux (Linspire)
- Linux (Maemo)
- Linux (Mageia)
- Linux (Mandriva)
- Linux (Mint)
- Linux (RedHat)
- Linux (Slackware)
- Linux (SUSE)
- Linux (Ubuntu)
- Linux (VectorLinux)
- LiveArea
- Mac OS
- MeeGo
- MINIX 3
- MorphOS
- MSN TV (WebTV)
- NetBSD
- Nintendo 3DS
- Nintendo DS
- OpenBSD
- OpenVMS
- Orbis OS
- OS X
- OS X 10.10 Yosemite
- OS X 10.3 Panther
- OS X 10.4 Tiger
- OS X 10.5 Leopard
- OS X 10.6 Snow Leopard
- OS X 10.7 Lion
- OS X 10.8 Mountain Lion
- OS X 10.9 Mavericks
- OS/2
- OS/2 Warp
- Palm OS
- PClinuxOS
- Plan 9
- QNX x86pc
- RISK OS
- Sailfish
- SCO OpenServer
- SkyOS
- Solaris
- Syllable
- Symbian OS
- Tizen 1
- Tizen 2
- Ubuntu Touch
- unknown
- webOS
- Wii OS
- Wii U OS
- Windows
- Windows 2000
- Windows 2003 Server
- Windows 3.x
- Windows 7
- Windows 8
- Windows 8.1
- Windows 95
- Windows 98
- Windows CE
- Windows ME
- Windows Mobile
- Windows NT
- Windows Phone 7
- Windows Phone 8
- Windows Phone 8.1
- Windows RT
- Windows Vista
- Windows XP
- Xbox platform
- XrossMediaBar (XMB)
weka
Weka example
concept Global {
    match '*'

    val cijfer = `(new dimml.uri(location.href)).query('cijfer') || -1`

    flow (weka)
        => select[`cijfer >= 0`]
        => weka[`model`]
        => out

    output[flowName = 'weka'] `
        console.log('Ik vind je cijfer '+leuk);
    `

    const model = '
rO0ABXNyABp3ZWthLmNsYXNzaWZpZXJzLnRyZWVzLko0OPz6dNZCE5ZkAgALRgAEbV9DRkkABm1f
U2VlZFoADm1fYmluYXJ5U3BsaXRzSQALbV9taW5OdW1PYmpaAAttX25vQ2xlYW51cEkACm1fbnVt
Rm9sZHNaABVtX3JlZHVjZWRFcnJvclBydW5pbmdaABBtX3N1YnRyZWVSYWlzaW5nWgAKbV91bnBy
dW5lZFoADG1fdXNlTGFwbGFjZUwABm1fcm9vdHQAK0x3ZWthL2NsYXNzaWZpZXJzL3RyZWVzL2o0
OC9DbGFzc2lmaWVyVHJlZTt4cgAbd2VrYS5jbGFzc2lmaWVycy5DbGFzc2lmaWVyWj6EIb0mI00C
AAFaAAdtX0RlYnVneHAAPoAAAAAAAAEAAAAAAgAAAAADAAEAAHNyADV3ZWthLmNsYXNzaWZpZXJz
LnRyZWVzLmo0OC5DNDVQcnVuZWFibGVDbGFzc2lmaWVyVHJlZb0x4A9TBOaeAgAERgAEbV9DRloA
CW1fY2xlYW51cFoADm1fcHJ1bmVUaGVUcmVlWgAQbV9zdWJ0cmVlUmFpc2luZ3hyACl3ZWthLmNs
YXNzaWZpZXJzLnRyZWVzLmo0OC5DbGFzc2lmaWVyVHJlZYb0WGdRMX6PAgAISQAEbV9pZFoACW1f
aXNFbXB0eVoACG1faXNMZWFmTAAMbV9sb2NhbE1vZGVsdAAxTHdla2EvY2xhc3NpZmllcnMvdHJl
ZXMvajQ4L0NsYXNzaWZpZXJTcGxpdE1vZGVsO1sABm1fc29uc3QALFtMd2VrYS9jbGFzc2lmaWVy
cy90cmVlcy9qNDgvQ2xhc3NpZmllclRyZWU7TAAGbV90ZXN0dAApTHdla2EvY2xhc3NpZmllcnMv
dHJlZXMvajQ4L0Rpc3RyaWJ1dGlvbjtMAA9tX3RvU2VsZWN0TW9kZWx0ACtMd2VrYS9jbGFzc2lm
aWVycy90cmVlcy9qNDgvTW9kZWxTZWxlY3Rpb247TAAHbV90cmFpbnQAFUx3ZWthL2NvcmUvSW5z
dGFuY2VzO3hwAAAAAAAAc3IAI3dla2EuY2xhc3NpZmllcnMudHJlZXMuajQ4LkM0NVNwbGl0KoXL
6qBQcrkCAAhJAAptX2F0dEluZGV4SQARbV9jb21wbGV4aXR5SW5kZXhEAAttX2dhaW5SYXRpb0kA
B21faW5kZXhEAAptX2luZm9HYWluSQAKbV9taW5Ob09iakQADG1fc3BsaXRQb2ludEQADm1fc3Vt
T2ZXZWlnaHRzeHIAL3dla2EuY2xhc3NpZmllcnMudHJlZXMuajQ4LkNsYXNzaWZpZXJTcGxpdE1v
ZGVsO2g1XMYoazECAAJJAAxtX251bVN1YnNldHNMAA5tX2Rpc3RyaWJ1dGlvbnEAfgAIeHAAAAAC
c3IAJ3dla2EuY2xhc3NpZmllcnMudHJlZXMuajQ4LkRpc3RyaWJ1dGlvbnZVfanqXPAwAgAERAAF
dG90YUxbAAhtX3BlckJhZ3QAAltEWwAKbV9wZXJDbGFzc3EAfgAQWwAQbV9wZXJDbGFzc1BlckJh
Z3QAA1tbRHhwQBQAAAAAAAB1cgACW0Q+powUq2NaHgIAAHhwAAAAAkAAAAAAAAAAQAgAAAAAAAB1
cQB+ABMAAAACQAgAAAAAAABAAAAAAAAAAHVyAANbW0THrQv/ZGf/RQIAAHhwAAAAAnVxAH4AEwAA
AAIAAAAAAAAAAEAAAAAAAAAAdXEAfgATAAAAAkAIAAAAAAAAAAAAAAAAAAAAAAABAAAAAj/paJTc
5EO7AAAAAj/oq6CUwHdIAAAAAkAUAAAAAAAAQBQAAAAAAAB1cgAsW0x3ZWthLmNsYXNzaWZpZXJz
LnRyZWVzLmo0OC5DbGFzc2lmaWVyVHJlZTuhto9xVMLLCQIAAHhwAAAAAnNxAH4ABAAAAAEAAXNy
ACJ3ZWthLmNsYXNzaWZpZXJzLnRyZWVzLmo0OC5Ob1NwbGl07g+wRu7ObrYCAAB4cQB+AA0AAAAB
c3EAfgAPQAAAAAAAAAB1cQB+ABMAAAABQAAAAAAAAAB1cQB+ABMAAAACAAAAAAAAAABAAAAAAAAA
AHVxAH4AFgAAAAF1cQB+ABMAAAACAAAAAAAAAABAAAAAAAAAAHBwc3IALHdla2EuY2xhc3NpZmll
cnMudHJlZXMuajQ4LkM0NU1vZGVsU2VsZWN0aW9uLsx6dKehVOUCAAJJAAptX21pbk5vT2JqTAAJ
bV9hbGxEYXRhcQB+AAp4cgApd2VrYS5jbGFzc2lmaWVycy50cmVlcy5qNDguTW9kZWxTZWxlY3Rp
b268sNDjDENL9gIAAHhwAAAAAnBzcgATd2VrYS5jb3JlLkluc3RhbmNlc/+7CJM0ZamkAgAFSQAM
bV9DbGFzc0luZGV4SQAHbV9MaW5lc0wADG1fQXR0cmlidXRlc3QAFkx3ZWthL2NvcmUvRmFzdFZl
Y3RvcjtMAAttX0luc3RhbmNlc3EAfgAoTAAObV9SZWxhdGlvbk5hbWV0ABJMamF2YS9sYW5nL1N0
cmluZzt4cAAAAAIAAAAAc3IAFHdla2EuY29yZS5GYXN0VmVjdG9y4dWyXE3jIQcCAARJABNtX0Nh
cGFjaXR5SW5jcmVtZW50SQAUbV9DYXBhY2l0eU11bHRpcGxpZXJJAAZtX1NpemVbAAltX09iamVj
dHN0ABNbTGphdmEvbGFuZy9PYmplY3Q7eHAAAAABAAAAAgAAAAN1cgATW0xqYXZhLmxhbmcuT2Jq
ZWN0O5DOWJ8QcylsAgAAeHAAAAADc3IAE3dla2EuY29yZS5BdHRyaWJ1dGX1sz60eXolYQIAEVoA
Dm1fSGFzWmVyb3BvaW50SQAHbV9JbmRleFoADm1fSXNBdmVyYWdhYmxlWgALbV9Jc1JlZ3VsYXJE
AAxtX0xvd2VyQm91bmRaABJtX0xvd2VyQm91bmRJc09wZW5JAAptX09yZGVyaW5nSQAGbV9UeXBl
RAAMbV9VcHBlckJvdW5kWgASbV9VcHBlckJvdW5kSXNPcGVuRAAIbV9XZWlnaHRMAAxtX0RhdGVG
b3JtYXR0ABxMamF2YS90ZXh0L1NpbXBsZURhdGVGb3JtYXQ7TAALbV9IYXNodGFibGV0ABVMamF2
YS91dGlsL0hhc2h0YWJsZTtMAAhtX0hlYWRlcnEAfgAKTAAKbV9NZXRhZGF0YXQAH0x3ZWthL2Nv
cmUvUHJvdGVjdGVkUHJvcGVydGllcztMAAZtX05hbWVxAH4AKUwACG1fVmFsdWVzcQB+ACh4cAAA
AAAAAAAAAAAAAAAAAAAAAAAAAAAAAQAAAAAAAAAAAD/wAAAAAAAAcHNyABNqYXZhLnV0aWwuSGFz
aHRhYmxlE7sPJSFK5LgDAAJGAApsb2FkRmFjdG9ySQAJdGhyZXNob2xkeHA/QAAAAAAAA3cIAAAA
BQAAAAV0AAR0YWFsc3IAEWphdmEubGFuZy5JbnRlZ2VyEuKgpPeBhzgCAAFJAAV2YWx1ZXhyABBq
YXZhLmxhbmcuTnVtYmVyhqyVHQuU4IsCAAB4cAAAAAJ0AAJpdHNxAH4AOAAAAAF0AAxwcm9ncmFt
bWVyZW5zcQB+ADgAAAADdAAEZGF0YXNxAH4AOAAAAAB0AAVhZndhc3NxAH4AOAAAAAR4cHNyAB13
ZWthLmNvcmUuUHJvdGVjdGVkUHJvcGVydGllczXMqIX7LVfRAgABWgAGY2xvc2VkeHIAFGphdmEu
dXRpbC5Qcm9wZXJ0aWVzORLQenA2PpgCAAFMAAhkZWZhdWx0c3QAFkxqYXZhL3V0aWwvUHJvcGVy
dGllczt4cQB+ADU/QAAAAAAAAncIAAAAAwAAAAB4cAF0AARuYW1lc3EAfgArAAAAAQAAAAIAAAAF
dXEAfgAuAAAABXEAfgA/cQB+ADtxAH4AN3EAfgA9cQB+AEFzcQB+ADABAAAAAQEB//AAAAAAAAAA
AAAAAQAAAAB/8AAAAAAAAAA/8AAAAAAAAHBwcHNxAH4AQz9AAAAAAAACdwgAAAADAAAAAHhwAXQA
BmNpamZlcnBzcQB+ADAAAAAAAgAAAAAAAAAAAAAAAAAAAAAAAAEAAAAAAAAAAAA/8AAAAAAAAHBz
cQB+ADU/QAAAAAAAAncIAAAAAwAAAAJ0AARsZXVrc3EAfgA4AAAAAHQACW5pZXQgbGV1a3NxAH4A
OAAAAAF4cHNxAH4AQz9AAAAAAAACdwgAAAADAAAAAHhwAXQABGxldWtzcQB+ACsAAAABAAAAAgAA
AAJ1cQB+AC4AAAACcQB+AE9xAH4AUXNxAH4AKwAAAAEAAAACAAAAAHVxAH4ALgAAAAB0AARkYXRh
PoAAAAEBAXNxAH4ABAAAAAIAAXNxAH4AHQAAAAFzcQB+AA9ACAAAAAAAAHVxAH4AEwAAAAFACAAA
AAAAAHVxAH4AEwAAAAJACAAAAAAAAAAAAAAAAAAAdXEAfgAWAAAAAXVxAH4AEwAAAAJACAAAAAAA
AAAAAAAAAAAAcHBxAH4AJnEAfgAqPoAAAAEBAXBxAH4AJnEAfgAqPoAAAAEBAXNxAH4AJwAAAAIA
AAAAc3EAfgArAAAAAQAAAAIAAAADdXEAfgAuAAAAA3NxAH4AMAAAAAAAAAAAAAAAAAAAAAAAAAAA
AAAAAQAAAAAAAAAAAD/wAAAAAAAAcHNxAH4ANT9AAAAAAAAIdwgAAAALAAAABXQADHByb2dyYW1t
ZXJlbnNxAH4AOAAAAAN0AAJpdHNxAH4AOAAAAAF0AARkYXRhc3EAfgA4AAAAAHQABHRhYWxzcQB+
ADgAAAACdAAFYWZ3YXNzcQB+ADgAAAAEeHBzcQB+AEM/QAAAAAAACHcIAAAACwAAAAB4cAF0AARu
YW1lc3EAfgArAAAAAQAAAAIAAAAFdXEAfgAuAAAABXEAfgBqcQB+AGhxAH4AbHEAfgBmcQB+AG5z
cQB+ADABAAAAAQEB//AAAAAAAAAAAAAAAQAAAAB/8AAAAAAAAAA/8AAAAAAAAHBwcHNxAH4AQz9A
AAAAAAAIdwgAAAALAAAAAHhwAXQABmNpamZlcnBzcQB+ADAAAAAAAgAAAAAAAAAAAAAAAAAAAAAA
AAEAAAAAAAAAAAA/8AAAAAAAAHBzcQB+ADU/QAAAAAAAA3cIAAAABQAAAAJ0AARsZXVrc3EAfgA4
AAAAAHQACW5pZXQgbGV1a3NxAH4AOAAAAAF4cHNxAH4AQz9AAAAAAAAIdwgAAAALAAAAAHhwAXQA
BGxldWtzcQB+ACsAAAABAAAAAgAAAAJ1cQB+AC4AAAACcQB+AHlxAH4Ae3NxAH4AKwAAAAEAAAAC
AAAAAHVxAH4ALgAAAAB0AARkYXRh'
}
Weka can be used to build predictive models. The 'weka' flow allows the execution of these models in DimML (see example to the right).
Weka version 3.6 models are compatible. The model's input attributes should be named identical to those in the input tuple. Similarly the output field will be named as described in the Weka model.
The model itself is encoded as a DimML constant in base64:
const model = '
  rO0ABXNyABp3ZWthLmNsYXNzaWZpZXJzLnRyZWVzLko0OPz6dNZCE5ZkAgALRgAEbV9DRkkABm1f
  ...
'
Parameters
| Name | Type | Description |
|---|---|---|
| model | string | Base64 encoded string, representing a Weka model |
Output
Variables containing the model's predictions.
Plugins
consent
Consent example
concept Global{
    match '*'

    flow (proof)
      => console

    flow (url)
      => console

    plugin consent[
        uid = '1',
        consentVersion = '1',
        callback = `websitenamespace.consentManager.init()`,
        lifetime = '31',
        proofFlow = 'proof',
        urlFlow = 'url'
    ]
}
Manage choices on (cookie) consent across pages and domains
The Consent API Plugin allows managing user consent preferences regarding cookies (referred to as “consent level”) over a DimML implementation. The Consent API Plugin allows for synchronizing consent over multiple domains. The Consent API Plugin ensures that the given consent level is enforced within the DimML implementation (i.e. when a user gives no consent for analytics, no data can be collected through DimML).
Parameters
| Name | Type | Description |
|---|---|---|
| uid | string | (optional) An identifier to describe the consent plugin. This can be used for synchronizing consent over multiple domains. |
| consentVersion | string | (optional, default 0) – The version of the consent popup. This can be used to invalidate previously given consent levels when the terms and conditions change. |
| callback | function | (optional) The function that will be called once the consent API is loaded. The function call takes place in a try/catch statement. |
| lifetime | string | (optional, default 30): Cookie lifetime in days |
| proofFlow | string | (optional) Parameter to define name for the flow that can be used for proof flow. |
| urlFlow | string | (optional) Name for the flow that captures what URLs are being requested. Flow consists of tuples like {url, level}. |
Body
The Consent API Plugin does not allow for definition of a plugin body
Output effect
In web browser
The Consent API plugin exposes one object (dimml.consent) to the client. This object has two methods.
| Method name | Description |
|---|---|
| dimml.consent.set(choice) | Sets the user consent level with the value of the choice parameter. The value of choice has to be a positive integer greater than 0.- – 0: Reserved for testing purposes, 1: Minimum Consent level (i.e. Consent for functional cookies only), – 2 and higher: Custom consent levels (e.g. 2 – all cookies, or 2 – analytics 3 – marketing). |
| dimml.consent.get() | Returns an integer corresponding to the level of consent that has been given. Values returned will be either -1 or 1 and higher integers. |
In web browser
The consent API plugin exposes two flows. One urlFlow that can be used for basic analytics on URLs based on server side data collection and one proofFlow that can be used for collecting the consent levels that people consent to.
Proof flow – Every time visitor makes a choice on what consent he/she gives, a tuple will be entered in the proof flow. The tuples consist of three fields: uid – The value to identify the Consent API implementation for which consent is given,
level: The level that a visitor consents to, url: The url at which consent is given, ip: Contains the ip of the visitor.
URL Flow – Every time the consent plugin is loaded a tuple is entered in the url flow. The tuples consist of one key:uid – The UID that loads the consent plugin, url – The url where the consent plugin is loaded, level – The level of the given consent level.
The Consent plugin does not provide new DimML language constructs.
Additional Remarks
- For browser that have Do Not Track enabled, a first party cookie will be set with value 1 for
choicesince this mode is considered to be an implicit expression of non-consent by the user. - If cookies (first and third party) are not supported through browser settings, this will be interpreted as an implicit consent of the lowest level. This choice will not show up in the proof flow. If only third party cookies are not accepted, the multi-domain consent will not be stored.
- The consent status is managed with browser cookies. Since this type of cookies is not shared among browsers, a user has to make a choice for each browser separately.
- Changes in given consent are not actively pushed to the client once O2MC Consent is loaded. In a situation where a client changes the consent level, the page code is within that pageview responsible for updating the consent status. Similarly, consent status will not be pushed to other tabs where the same page is opened.
content
Example
@groovy
concept Redirect {
    match '*'

    request[ua = `headers['user-agent']`]
    flow useragent[ua = 'ua'] => code[search = `ua?.os?.toLowerCase()`] => out

    content `"http://lmgtfy.com/?q=${search}+sucks"`
}
Redirects the HTTP request to another URL using a 307 HTTP response. The body content can be a string or a code block. If it is a code block and there is at least one flow that matches the flowName parameter (without flowName parameter it matches the default flow), the flow is called and its output (through the out flow element) is available in the code block.
The result of the content body should be the URL to redirect to. The plugin is aware of request and cookie plugin and in some cases may redirect twice to retrieve third-party cookies set on a different Dimml domain or path.
Parameters
| Name | Type | Description |
|---|---|---|
| flowName | string | (optional) name of the flow to call before evaluating the plugin's body |
cookie
Example
@groovy

concept Image extends Images {
    match '*.png'

    flow
        => code[uri = `getBeer([path, ref, choice])`]
        => out

    request[path = `path`, ref = `headers.referer`]
    cookie[namespace = 'localhost']
    content `uri`
}

concept Images {
    const JUMBO = 'http://static-images.jumbo.com/product_images/'
    const BEERS = `{
        brand: JUMBO+'904821KRT-180_360x360.png',
        heineken: JUMBO+'175563DS-180_360x360.png',
        grolsch: JUMBO+'147464KRT-2_360x360.png'
    }`

    def getBeer = {list => `
        list = list*.toLowerCase()
        BEERS.find{list*.contains(it.key).contains(true)}?.value?:randomBeer()
    `}

    def randomBeer = `BEERS.values().getAt((Math.random()*BEERS.size()) as int)`
}

concept HTML {
    match '*/index.html'

    html
`<html><head></head><body>
    <img id='img' style='position:absolute' src='load.png' />
    <script>function a(){var b=document.getElementById("img");b.style.left=window.innerWidth/2-180;b.style.top=window.innerHeight/2-180}window.addEventListener("resize",a);a();</script>
</body></html>`

    on choice do {cookie[namespace = 'localhost', choice = `beer`]}
}
This example combines the
cookie,contentandrequestplugins. ThegetBeerfunction inImagestakes a list of strings and selects an image for the first beer from theBEERScollection that is found in the list. If no beer was found, a random beer is chosen. In theImageconcept this function is used on the request path, referer and a 'choice' parameter that comes from using thecookieplugin.The
HTMLconcept makes a small HTML page available that displays the image using a URL relative to the page: load.png. This loads theImageconcept. Furthermore, it exposes adimml.event('choice', {beer: [beer]})event. This event can be triggered in Javascript and it calls the cookie plugin to store the value ofbeerin a third-party cookie on the Dimml domain.
Stores or retrieves a value from a third-party cookie namespace. Namespaces are isolated per partner. The cookies are stored on a Dimml domain. An optional namespace is used to store and retrieve cookies in the same namespace. If omitted cookies are tied to the concept where the cookie plugin is defined in.
Any other parameters are interpreted as storage operations: the code block is evaluated and the value stored in the namespace under the parameter name. If there is a stored value for a parameter that is not mentioned in the parameter list, its value is retrieved and added to the tuple.
Parameters
| Name | Type | Description |
|---|---|---|
| namespace | string | (optional) a string that identifies the namespace within a partner to store or retrieve cookie values in. When the namespace parameter is omitted the current concept is used as the namespace. |
| [any] | code | setter code for the specified cookie value |
debug
Debug example
concept Global{
    match '*'

    val url = `document.location.href`

    flow
    => debug
    => code[view = `'1'`]
    => debug
    => code[done = `'1'`]

    plugin debug
}
Allows the use of in browser feedback of the current state of an DimML application
The debug plugin allows the providing run time feedback on the current fields and their values. Any use of the debug flow element allows the feedback of the state at that time. Also any errors when compiling or executing the DimML code are provide in the browser. The information is share in the console log where the same concept is used as the one where the debug statement is used or the error occurs.
Parameters
None
Body
The Debug Plugin does not allow for definition of a plugin body
Output effect
Every use of the debug element for each data tuple results in the execution of a console log function contain the fields and their values. For that purpose the matched concept needs to be triggered by the browser. Note that the console flow element allows the use of server side data evaluation and debugging.
html
Example
concept Test {match '*/index' html `

<h1>Hello from HTML</h1>

` script `

document.body.innerHTML += '<h1>Hello from DimML</h1>'

`}
Enables the retrieval of HTML content embedded in a Dimml file. The HTML includes the SloC and the page is tied to the concept that created it. This enables the use of other plugins, e.g. script, output.
The address that exposes the HTML content is constructed using the hashed Dimml address of the file. Hence, the file should be placed in the root. In the O2mc studio go to the file in the project explorer, press the right mouse button, properties, Public API. The hash is the SHA1 hash of the Dimml address. The URL will then be:
https://dynamic.dimml.io/content/<hash>/index
concept Test {
    match '*/index'
    html

    flow
        => ip
        => code[ts = `new Date().getTime()`]
        => out

    output `
        document.body.innerHTML += '<h1>The server unix time is '+ts+'</h1>'
        document.body.innerHTML += 'and your ip is '+ip`
}
Combining with the output plugin is also possible, see the example to the right.
input
Input example
concept Input {
  match '*'

  plugin input:csv['field1','field2']

  flow
    => buffer:aggregate['1s', count = 'count field1']
    => console

  const $options = `{inputRate: 500}`
}
Allows the use files as source of data of an DimML application
The input plugin allows the use of files as a basis for processing data. At this time only the CSV option is available for the input plugin. Every line in the file will be translated into a seperate event where each of the columns are used as fields of the input tuple. Since the files are translated into event immediately, files with a large number of lines of code could flood the output sources. Therefore it is possible to the rate at which the event are send to the flows. By default no more than 100 rows per second will be processed.
Parameters
| Name | Type | Description |
|---|---|---|
| names | list of strings | The columns of the files. The names are used as fields |
| $options | constant | Input rate: number of events per seconds |
Body
The Input Plugin does not allow for definition of a plugin body
Output effect
Input example with non-exact matching
concept Input {
  match '*csvinput*'

  plugin input:csv['field1','field2','field3','field4']

  flow
    => select[`field4 != null`@groovy]
    => buffer:aggregate['1s', count = 'count field1']
    => console

  const $options = `{inputRate: 500}`
}

concept Global {
  match '*'

  ..
}
Every line of the file will be translated into a separate event to the unnamed flow of the DimML concept. The columns of each line are translated into fields. All unnamed flows will be called immediately in parallel for each of the events in parallel; no sequence can be counted upon.
To actually send the files to the DimML application the file has to be send using POST. The destination URL should be http://dynamic.dimml.io/input and the content type text/csv (for the current CSV transformation). A referrer also needs to be added such that a match is made with the concept containing the input plugin. The referrer can also contain a link to a specific environment, as is the case for web pages. For example if a file example.com.dimml exisits where a concept is made for the file processing which uses csvinput as match rule, the following curl command sends the local data.csv file to the correct concept in the plem environment
curl -H "Content-Type: text/csv" -i -X POST --data-binary @data.csv --referer http://www.example.com/csvinput/other?dimml=plem http://dynamic.dimml.io/input
As with matching for web pages, the fact that the match is not exact (but only a substring) is fine. It is recommended to always use a non existing folder/substring in the concept for the input plugin. For instance using the asterix as match rule will result also in other dimml events, such as web page loads, to be processed as if it is a CSV file. An additionally safety is to check if the parsing of each row is correct, which can be checked if the last column exists. As per example on the right.
output
Output example
concept Global {
    match '*'

    val url = `window.location.href`
    val SessionId = `sessionStorage.dimmlcid=sessionStorage.dimmlcid||guid()`

    flow(in)
    => session['SessionId',
        PagePath = `(session.pagepath=(session.pagepath?:[]))<<url`@groovy]
    //The out element is necessary for the output plugin to work!
    => out

    plugin debug

    plugin output[flowName = 'in'] `
        console.log('data in the output plugin:'+PagePath);
    `
}
Allows the use of server side data in output to the input source
The output plugin allows the use of server side data inside an instruction back into the original source of an event. Code for the fields in the source (vals) is executed before server side processing takes place and does not provide a way to receive data afterwards. At this time the output plugin is only available for web pages triggering a request to DimML by the SLOC. Therefore the code block as body is currently only Javascript. In the execution of that block, data processed server side by a DimML application is available.
Parameters
| Name | Type | Description |
|---|---|---|
| name | string | Flow name of the flow that executes server side and provides input to the output plugin |
Body
Source code for the channel triggering the event
Output effect
With the use of the out code element all fields and their values at that time are collected and the output plugin is triggered. The fields will be available as local variables in the body of the plugin. After the flow has executed completely, the body will be send back to the source and executed there.
request
Request example
@groovy

concept GetAllHeaders {
  match 'headers'

  request[allheaders = `headers`]

  flow
  => console
}

concept Test {
  match '*'
  request[ref = `headers.referer`]

  flow
  => console
}
Makes data from the Request header available in the data tuple
The request plugin makes headers and other properties of the request available as fields in the data tuple
Parameters
| Name | Type | Description |
|---|---|---|
| fields | list of field assignments | A list of field definitions, where the fields are added to the data tuple based on data in the code block. All properties, like headers, are available as object in the code block. |
Body (only for rest)
None
Output effect
All field assignments are executed and the fields are available with their new values
response
Example
@groovy
concept DimmlIcon {
    match '*'
    response[headers = `['content-type': 'image/gif']`] `DIMML_ICO.decodeBase64()`
}

const DIMML_ICO = 'AAABAAEAEBAAAAEACABoBQAAFgAAACgAAAAQAAAAIAAAAAEACAAAAAAAAAEAAAAAAAAAAAAAAAEAAAAAAAAAAAAAqHUAAM+XAADFo1MAs38AALR/AACodQYArnwMAKh3DwD///8AwJpCAPfx5QCqdwgAr3sAAKJ0AAC3jCgAxZlLAKh1BQDXnQAApnQAAK58CwC6hQAAyqlgALJ+AACzfgAAKTHnAKV6SwCodQQAqncAAKx7EwCwghkArHsMALaBAAB8Z6UAqHcGAL2XaAC1ikwAwYsAAL+UTADw48IAr4NMALuQTQCqf00AsX0AAL2RRAC7kjQAyJEAALCFTQAAAAAAAAAAAAAAAAAAAAAAAAAAAAAAAAAAAAAAAAAAAAAAAAAAAAAAAAAAAAAAAAAAAAAAAAAAAAAAAAAAAAAAAAAAAAAAAAAAAAAAAAAAAAAAAAAAAAAAAAAAAAAAAAAAAAAAAAAAAAAAAAAAAAAAAAAAAAAAAAAAAAAAAAAAAAAAAAAAAAAAAAAAAAAAAAAAAAAAAAAAAAAAAAAAAAAAAAAAAAAAAAAAAAAAAAAAAAAAAAAAAAAAAAAAAAAAAAAAAAAAAAAAAAAAAAAAAAAAAAAAAAAAAAAAAAAAAAAAAAAAAAAAAAAAAAAAAAAAAAAAAAAAAAAAAAAAAAAAAAAAAAAAAAAAAAAAAAAAAAAAAAAAAAAAAAAAAAAAAAAAAAAAAAAAAAAAAAAAAAAAAAAAAAAAAAAAAAAAAAAAAAAAAAAAAAAAAAAAAAAAAAAAAAAAAAAAAAAAAAAAAAAAAAAAAAAAAAAAAAAAAAAAAAAAAAAAAAAAAAAAAAAAAAAAAAAAAAAAAAAAAAAAAAAAAAAAAAAAAAAAAAAAAAAAAAAAAAAAAAAAAAAAAAAAAAAAAAAAAAAAAAAAAAAAAAAAAAAAAAAAAAAAAAAAAAAAAAAAAAAAAAAAAAAAAAAAAAAAAAAAAAAAAAAAAAAAAAAAAAAAAAAAAAAAAAAAAAAAAAAAAAAAAAAAAAAAAAAAAAAAAAAAAAAAAAAAAAAAAAAAAAAAAAAAAAAAAAAAAAAAAAAAAAAAAAAAAAAAAAAAAAAAAAAAAAAAAAAAAAAAAAAAAAAAAAAAAAAAAAAAAAAAAAAAAAAAAAAAAAAAAAAAAAAAAAAAAAAAAAAAAAAAAAAAAAAAAAAAAAAAAAAAAAAAAAAAAAAAAAAAAAAAAAAAAAAAAAAAAAAAAAAAAAAAAAAAAAAAAAAAAAAAAAAAAAAAAAAAAAAAAAAAAAAAAAAAAAAAAAAAAAAAAAAAAAAAAAAAAAAAAAAAAAAAAAAAAAAAAAAAAAAAAAAAAAAAAAAAAAAAAAAAAAAAAAAAAAAAAAAAAAAAAAAAAAAAAAAAAAAAAAAAAAAAAAAAAAAAAAAAAAAAAAAAAAAAAAAAAAAAAAAAAAAAAAAAAAAAAAAAAAAAAAAAAAAAAAAAAC0gIAUAAAAAAAAAAAAABBYJEhISFQQAAAAAAAAAFwICCQkCAgICFwAAAAAADS4uLgkJLi4uLi4NAAAAACslJSUJCSUlJSUnAwAAABQsFRUVFRUVFQkJCQkPAAAHEBAQGBgOGRgYCRgYHAAAHyYmCQkmIRkmJhwcHBwAAB4JCQkJKSkpKSkpKRMBAAAACgkkJCQkIwkkJCQdAAAAAAwvLy8vLwsJKC8vDAAAAAAADCoqKioqCQkqDAAAAAAAAAAiCBoaGgktIgAAAAAAAAAAAAARBgYbAAAAAAAAAAAAAAAAAAAAAAAAAAAAAP//AAD8PwAA8A8AAOAHAADAAwAAwAMAAIABAACAAQAAgAEAAIABAADAAwAAwAMAAOAHAADwDwAA/D8AAP//AAA='
Allows arbitrary HTTP responses from Dimml. The body is a code block that should return the content of the HTTP response. A byte array or ByteBuffer is returned as is, other types are interpreted as character data encoded in UTF-8. Headers are set through a parameter.
The HTTP request can be initiated in the same way as the html plugin. You can also call the concept using the ?dimml.concept parameter. This allows specification of the concept name as well, in which case you can omit the match statement:
https://cdn.dimml.io?dimml.concept=//david!WPpd23ZO@test/DimmlIcon
or
https://cdn.dimml.io/content/1875c0b583fb7069e6634f93ba33cd2cefc76262/
The response plugin can be combined with a REST API through the rest plugin. In that case you should enable the 'rest' flag parameter. The concept must not contain a rest:json plugin, but it can be the target of a rest plugin redirection.
Parameters
| Name | Type | Description |
|---|---|---|
| headers | code | a code block that should result in a map or Javascript object containing the headers to send |
| rest | string | (optional) "true" or "false" to indicate wether the response plugin is being combined with a REST API |
| flowName | string | (optional) alternative flow name to call before building the response body. A flow is optional, but when specified it should contain a reachable 'out' flow element. |
rest
REST Example
@groovy

concept API {
  match '*restapi*'

  rest '
    GET  /user     => ListUsers
    POST /user     => AddUser
    GET  /user/:id => GetUser
    PUT  /user/:id => UpdateUser
         *         => Error
  '
}

concept ListUsers extends JSON {
  flow(api_call)
  => code[conceptName = `'ListUsers'`]
  => filter['conceptName']
  => out
}

concept AddUser extends JSON {
  flow(api_call)
  => code[conceptName = `'AddUser'`]
  => filter['conceptName']
  => out
}

concept GetUser extends JSON {
  flow(api_call)
  => code[conceptName = `'GetUser'`]
  => filter['conceptName','id']
  => out
}

concept UpdateUser extends JSON {
  flow(api_call)
  => code[conceptName = `'UpdateUser'`]
  => filter['conceptName','id']
  => out
}

concept Error extends JSON {
  flow(api_call)
  => code[conceptName = `'Error'`]
  => filter['conceptName']
  => out
}

concept JSON {
  rest:json[omitList = 'true', flowName = 'api_call', bodyField = 'body']

}
Creates a REST API which can be accessed from external sources
The rest plugin creates a REST API and allows the definition of endpoints and matching concepts. The plugin is used both in a high level concept as well as in the specific concepts that the high level concept points to. In the specific concepts the name of the plugin is rest:json, indicating that the data is processed in JSON format. Currently no other formatting options are available.
The rest plugin facilitates the HTTP methods GET, POST, PUT and DELETE. Apart from pointing a specific URI to a DimML concept, parameters can also be captured from the URI and made available as field in the data tuple. The out flow element is used to send the current data tuple as response. Additionally all query parameters of the URI are available as fields in the data tuple.
Parameters (only for rest:json)
| Name | Type | Description |
|---|---|---|
| flowName | string | Name of the flow to execute after the REST API end point is called |
| omitList | string | Value true or false indicating if the data tuple should be provided as a list or not. If set to false, the result would be [“user”:”Peter”,”age”:”32″], if set to true, the result is “user”:”Peter”,”age”:”32″. |
| bodyField | string | When using POST as HTTP Method, data can not only be provided as key value pairs in the URI, but also as a specific object. If this is the case, the bodyfield parameter defines the field name in the data tuple that can be used to access the data object. |
Body (only for rest)
| Name | Type | Description |
|---|---|---|
| API | string | a string containing the REST API definition. Each rows defines an end point by the HTTP method, URI (possibly containing fields to capture from the URI) |
Output effect
Every call to the REST API will result in a event being processed according to the URI end point that is called. The data tuple that is set at the moment the out flow element is executed, is provided as response.
Calling the example API
To actually call the example API to the right, the following CURL commando can be executed. The referrer should contain the top level private domain of the DimML file as well as other substring defined in the match rule for the REST API top level concept. Additionally the REST API URI should be placed after the dynamic.dimml.io URL.
curl -H "Content-Type: text/csv" -i --referer "http://www.yourdomain.com/restapi?dimml=yourenvironment" dynamic.dimml.io/ListUsers
script
Script example
concept Global {
  match '*'

  plugin script `
    console.log('the script plugin executed this code')
  `
}
Execute client side Javascript code
The Script plugin makes sure that a piece of Javascript code is executed whenever the concept is matched. The difference with executing Javascript code in the Pre Match is that the Pre Match code is run before concept matching takes place and therefore the Pre Match Javascript code is always executed. The script plugin has a code block as body which will always be executed as client side Javascript.
The script plugin is executed in parallel to the client side Javascript code in the val/field definitions. Therefore no data can be share accross these two options for executing Javascript code.
Note that the output plugin is executed after the execution of all flows and not when the concept is matched. The output plugin can be used to execute Javascript code, using data processed server side by a flow.
validator
Validator example
concept Global {
 val pageName[
 validation = `validatePagename(value)`,
 validationLabel = 'correct-pagename',
 validationMessage = 'something went wrong at :url'
 ] = `data.pageName`

 val url = `location`

 def validatePagename = {pageName => `
 if (pageName == 'home')
 return true;
 else
 return "pagename at :url is not home";
 `}

 flow (validate)
 => console

 plugin validator [flowName = 'validate'] `captureSC(validate)`

 def captureSC = {validate => `
 validate({pageName: 'not home'});
 `}
}
Validate the data correctness on individual fields following user defined rules
The O2MC Platform Validator Plugin allows users to validate arbitrary data input following user-defined rules. These rules are defined by extending the indivual fields at the start by extending the val statements. Validation on fields can occur based on fixed values, regular expressions and code (resulting in a boolean result). For each individual field validation an event is triggered in the validation flow. As a result a single event with 5 fields, could lead to 5 validation events handled by the validation flow.
Parameters
| Name | Type | Description |
|---|---|---|
| flowName | string | (optional, default: ‘validate’) – The name of the flow containing the output of the Validator Plugin. |
Body
When a body is specified, the validator plugin no longer collects data using the standard collection mechanism. The body is interpreted as Javascript that can use an injected function named ‘validate’ to send a JSON object that requires validation. This separates the code that collects data from the validator plugin and is mainly used when validating analytics and marketing pixels.
Output effect
In web browser
The validator plugin does not expose any new functionality within the client’s browser.
Server side
The validator plugin adds three language constructs to the DimML language. A full example of a validation rule with all supported functionality is as follows:
val pageName[
  validation = validatePagename(value),
  validationLabel = 'correct-pagename',
  validationMessage = 'something went wrong at :url'
] = data.pageName
| Name | Type | Description |
|---|---|---|
| validation | mixed | The validation rule. The rule can be defined as a string, as a regex or as a function literal. If the rule is a string, exact string matching will be performed. If the rule is a regex the variable is checked for the presence of a matching pattern. A code literal should yield an expression (written in a server-side language) that uses the ‘value’ argument to return either the boolean value ‘true’ (if validation was successful) or any other value which will be interpreted as ‘false’. In case the other value is a string, it is used instead of the ‘validationMessage’. |
| validationLabel | string | A label to be used for data collection. This label will be incorporated in the tuples in the data flow. |
| validationMessage | string | A message that can be used for debugging. The message can be enriched with DimML variables for extra information (e.g. ’Error occurred on :url’). |
The Validator Plugin implements a flow that can be named using the flowName parameter. The flow contains tuples with a tuple per validation rule and per tuple the label of the validation rule, the name of the variable, the result of the validation rule and an optional validation message. The implementation in the example would give the following output if the validation rule would not hold:
{validation: false, validationMessage: 'pagename at http://example.com/index.html is not home', validationLabel: 'correct-pagename', validationName: 'pageName'}
If the validation rule would hold the flow would contain the following tuple:
{validation: true, validationLabel: 'correct-pagename', validationName: 'pageName'}